
8 Best Yoga Stretches for Lower Back Relief in 2025

Lower back pain can feel like an unwelcome houseguest that has seriously overstayed its welcome, turning simple movements like picking up your socks into an Olympic event. Whether your back is screaming from an eight-hour desk marathon, a killer workout, or just the general chaos of life, that persistent, nagging ache can throw a major wrench in your plans. But what if you could gently show that pain the door? What if the secret wasn't a complicated routine but a series of mindful, targeted movements?
This is where the magic of yoga comes in. We’re not talking about pretzel-like poses that require Cirque du Soleil-level flexibility. Instead, we’re focusing on a strategic approach designed to lengthen, strengthen, and bring sweet relief to your lumbar spine. In this ultimate guide, we are diving deep into the 8 best yoga stretches for lower back that will help you find freedom and mobility. We'll break down each pose with clear, step-by-step instructions so you know exactly what to do.
But we're going beyond just a simple list. For each stretch, you’ll discover:
We’ll even show you how to use cutting-edge tools like the Dalm app to perfect your form with AI-powered feedback, ensuring you get the maximum benefit from every movement. Get ready to roll out your mat, say goodbye to that nagging ache, and reclaim your comfort, one glorious stretch at a time.
Don't let the name fool you; Child's Pose is a powerhouse of relief disguised as a simple resting position. Think of it as hitting the reset button for your lower back. This gentle, restorative forward fold is your go-to move when your lumbar spine is screaming for a break. It works by gently stretching the muscles along your spine, specifically the lengthy erector spinae group, while also giving your glutes and hips a much-needed release.
By folding your torso over your thighs, you create space between your vertebrae, which helps decompress the spinal discs. It's the yoga equivalent of a long, satisfying sigh for your back, making it one of the absolute best yoga stretches for lower back pain, especially for beginners.
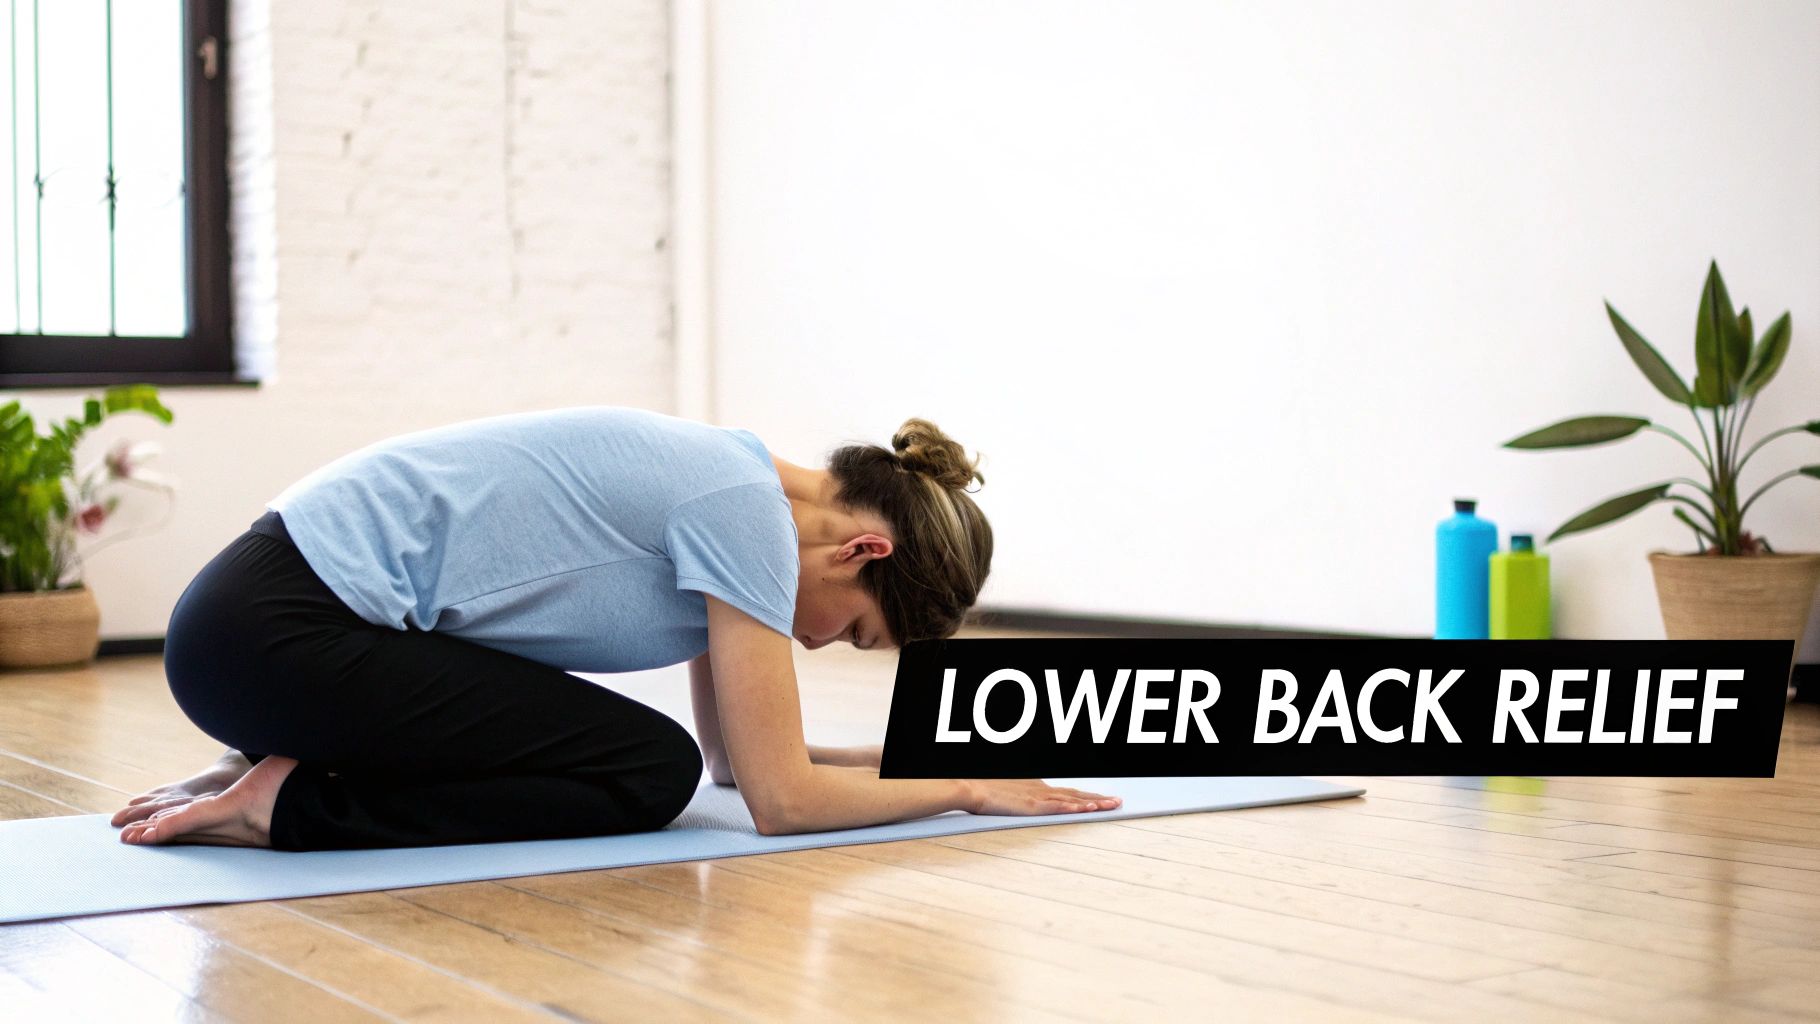
Ready to melt away that tension? Here’s your step-by-step guide to finding blissful relief in Child's Pose:
Getting the most out of Child's Pose means making it work for your body. If you feel any pinching or discomfort, try these modifications:
Key Insight: The goal isn't to force yourself into a deep fold but to find a position where you can fully release and breathe. True relief comes from surrender, not strain.
To ensure your spine is lengthening correctly and not rounding excessively, try using the Dalm app. Its AI pose analysis provides real-time feedback, helping you maintain a neutral spine and get the full decompressive benefits of the pose. For more guidance on how long you should relax in this pose, check out our detailed guide on how long to hold yoga poses.
If your lower back feels like a stiff, uncooperative plank of wood, Cat-Cow is the gentle, rhythmic movement it's craving. This dynamic duo isn't a static hold; it’s a flowing sequence that wakes up your spine, increases circulation, and promotes flexibility. Think of it as flossing for your vertebrae, gently moving each segment to release tension and improve mobility.
By transitioning between an arched back (Cow Pose) and a rounded spine (Cat Pose), you warm up the muscles supporting your lumbar region and improve your body's awareness of your spinal alignment. This fluid motion is one of the best yoga stretches for lower back stiffness, especially first thing in the morning or after a long day hunched over a desk.
Ready to get your spine moving? Here’s your step-by-step guide to this wonderfully fluid stretch:
The key to Cat-Cow is mindful movement, not extreme motion. Listen to your body and try these modifications for a better experience:
Key Insight: The magic of Cat-Cow is in the connection between breath and movement. Let your breath guide the pace, allowing for a slow, deliberate mobilization of your spine rather than a rushed, jerky motion.
To perfect your form and ensure you’re not overextending or rounding incorrectly, use the Dalm app. Its AI pose analysis offers real-time feedback on your spinal alignment through both phases of the stretch, helping you find the perfect rhythm and maximize the therapeutic benefits.
If there's one pose that embodies yoga, it's this one. Downward-Facing Dog is far more than just a transition; it's a full-body reset in an inverted V-shape. This iconic pose is a master of multitasking, simultaneously stretching and strengthening your entire posterior chain, from your calves and hamstrings right up to your lower back. By anchoring your hands and feet and lifting your hips high, you create gentle, natural traction for your spine.
This spinal decompression helps relieve pressure on the lumbar vertebrae, making it one of the best yoga stretches for lower back relief and rejuvenation. The inverted nature of the pose also encourages blood flow to the spine, delivering a fresh dose of oxygen and nutrients. It's a foundational pose in almost every vinyasa flow class for a good reason: it builds strength while providing a profound release.

Ready to create that perfect V-shape and decompress your spine? Follow these steps to find your ideal Downward-Facing Dog:
Tight hamstrings are the number one reason this pose feels challenging. Don't force it; adapt it to feel good in your body with these modifications:
Key Insight: The goal is a long, neutral spine, not perfectly straight legs. Bending your knees can unlock the true decompressive power of this pose by allowing your lower back to release fully.
Struggling to know if your back is rounding? The Dalm app's AI pose analysis is perfect for this. It gives you real-time feedback on your spinal alignment, helping you find that sweet spot where you are lengthening your spine safely and effectively.
If intense backbends like Cobra or Upward-Facing Dog make your lower back cringe, meet your new best friend: Sphinx Pose. This gentle, supported backbend is the perfect entry point for strengthening your spine without the strain. Think of it as a baby backbend that offers major relief, gently awakening the muscles that support your lumbar spine while giving your abs and hip flexors a mild, welcome stretch.
By propping yourself up on your forearms, you create a controlled, gentle arch in your spine. This action strengthens the erector spinae muscles, which run along your back and are crucial for good posture, and promotes healthy spinal extension. It's an accessible and therapeutic pose, making it one of the best yoga stretches for lower back support, especially for those new to yoga or recovering from sensitivity.
Ready to build a stronger, more resilient back? Here’s your step-by-step guide to finding stability in Sphinx Pose:
Getting the most from Sphinx Pose is all about proper alignment and support. If you feel any pinching, try these simple adjustments:
Key Insight: The magic of Sphinx Pose lies in its subtlety. You're aiming for a gentle, energizing lift that strengthens your back, not a deep, forceful arch that compresses it.
To ensure your pelvis remains grounded and you aren't over-arching, use the Dalm app. Its AI feedback can alert you to hyperextension in your lumbar spine, helping you find the perfect balance between effort and ease for maximum therapeutic benefit.
If your lower back pain often feels like it's radiating from your hips or glutes, Pigeon Pose is the deep-tissue release you've been dreaming of. This pose isn't just a stretch; it's a direct conversation with your piriformis, a small but mighty muscle deep in your glutes that can cause major lower back and sciatic nerve grief when tight. By intensively opening the hips and stretching the external rotators, Pigeon Pose cuts off lower back strain at one of its primary sources.
This pose is a physical therapist favorite for a reason. It masterfully untangles the knotted tension in the hip complex that often masquerades as lumbar pain. For this reason, it stands out as one of the best yoga stretches for lower back relief, particularly for those who sit for long periods or engage in activities like running and cycling.
Ready to unlock those tight hips? Here’s your step-by-step guide to finding sweet relief in Pigeon Pose:
Pigeon Pose is intense, so modifications are key to making it accessible and effective. Listen to your body and try these adjustments:
Key Insight: The goal is to release deep-seated hip tension, not to get your shin parallel to the mat. Proper alignment, with squared hips, is far more important for back relief than the depth of the pose.
Maintaining squared hips is crucial, but it's a common challenge. The Dalm app's AI pose analysis can be your best friend here, providing real-time feedback to ensure you're not compensating by tilting, which would reduce the stretch's effectiveness for your lower back.
Imagine wringing out a tense, knotted towel and feeling it become soft and pliable again. That's exactly what the Supine Twist does for your spine. This reclined twist is a restorative dream, gently rotating your vertebrae to release deep-seated tension in your lower back, glutes, and even your outer hips. It’s a passive stretch, meaning gravity does most of the work for you.
Lying on your back removes the stress of gravity, allowing your spinal muscles to relax completely. As you gently guide your knee across your body, you create a mild, therapeutic rotation that can decompress the spine and improve mobility. This makes it one of the absolute best yoga stretches for lower back relief, especially as a wind-down pose at the end of a long day or a tough workout.
Ready to twist and shout (with relief)? Here’s your step-by-step guide to this deeply satisfying stretch:
A great twist is a comfortable twist. If you feel any sharp pain or pinching, adjust with these modifications:
Key Insight: The magic of this pose is in the surrender. Don't pull or force the twist. Let your breath and gravity do the heavy lifting to coax your muscles into a state of release.
To ensure you are rotating from your spine and not just your hips, the Dalm app can be an invaluable guide. Its AI feedback helps you keep your shoulders grounded and your rotation even, maximizing the therapeutic benefits. For a deeper understanding of how poses like this contribute to healing, you can explore the principles of what is therapeutic yoga.
Ready to build a stronger, more resilient back? Bridge Pose is less of a passive stretch and more of an active strengthener that provides incredible relief. This gentle backbend lifts your hips off the floor, firing up your glutes and hamstrings, which are often underdeveloped in people with lower back pain. By strengthening these key support muscles, you take a significant load off your lumbar spine.
At the same time, Bridge Pose gently lengthens the spine, creating space between the vertebrae and stretching the hip flexors and chest. It's a dual-action pose that both strengthens and stretches, making it one of the most effective and best yoga stretches for lower back support and long-term health. It’s frequently recommended by physical therapists for its ability to activate the posterior chain safely.
Let’s build that bridge to a happier back. Follow these steps to find strength and release:
To get the most out of your Bridge Pose, focus on alignment and mindful movement:
Key Insight: The power of Bridge Pose comes from using your legs and glutes to lift, not from arching your lower back. The lift should feel active and supported, not forced.
To perfect your alignment, use the Dalm app. Its AI feedback can detect if your hips are lifting unevenly or if your knees are drifting apart, providing real-time cues to help you engage the right muscles and protect your spine. For more ways to integrate this pose, explore our guide on creating a restorative yoga sequence.
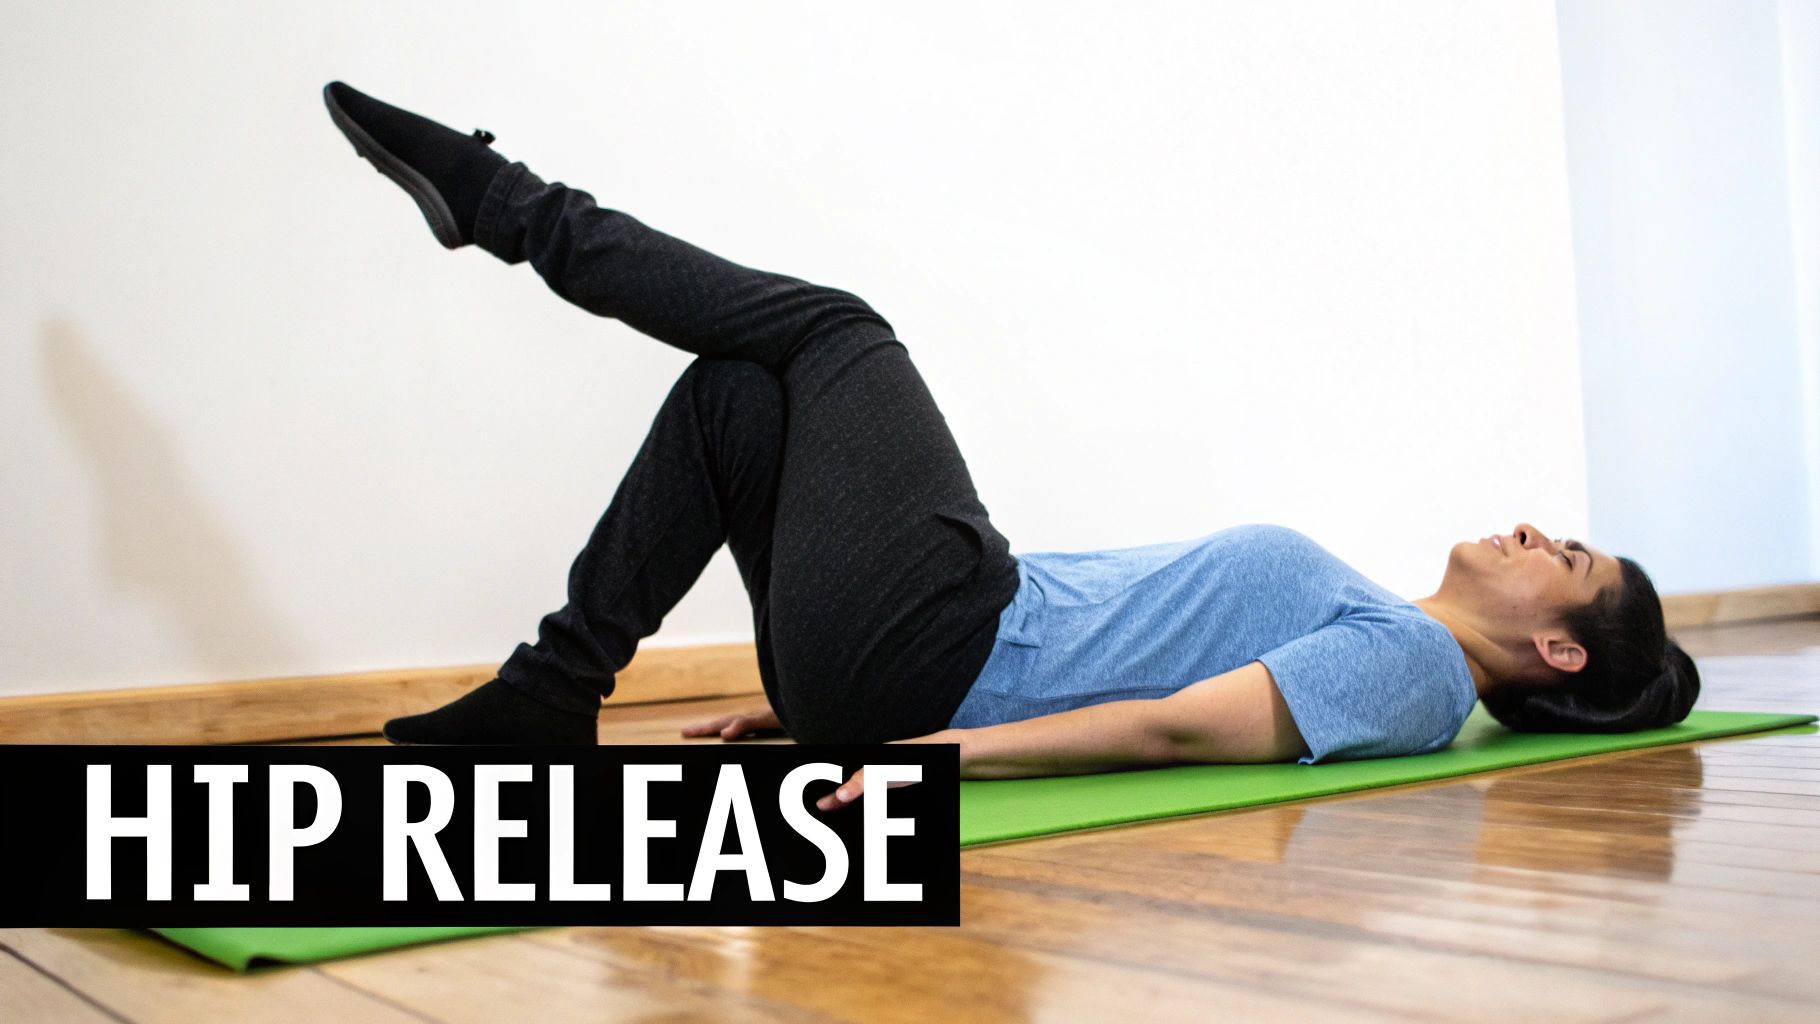
Say hello to your new best friend for tight hips and an aching lower back. The Reclined Figure 4 Stretch, often called "Eye of the Needle" or Supta Pigeon, is the gentle giant of hip openers. It provides a deep, satisfying release for your glutes and piriformis muscle, which are notorious culprits in lower back pain and sciatica, all while your back is fully supported by the mat.
This pose is pure bliss because it targets hip tension directly without putting any stress on your knees or requiring intense flexibility. It's the perfect cool-down stretch and one of the best yoga stretches for lower back because it safely unwinds the tightness that builds up from sitting all day, making it a staple in both yoga classes and physical therapy routines.
Ready to thread the needle and find relief? Here's how to ease into this restorative hip opener:
Make this pose feel like a custom-fit stretch for your body with these simple adjustments:
Key Insight: The goal is a deep, productive stretch, not a painful one. Listen to your body and find the edge where you feel the release without straining or forcing your hips.
A strong core is crucial for supporting the lower back, and this stretch is a perfect complement to a core-strengthening practice. To learn how to build foundational stability, explore our guide on yoga for core strength for beginners. The Dalm app can also help by confirming your alignment is safe and effective, ensuring your hips are level and your spine remains neutral throughout the pose.
And there you have it, your very own lower-back-loving arsenal! You've just journeyed through a powerful collection of the best yoga stretches for lower back pain, from the grounding surrender of Child's Pose to the gentle spinal release of a Supine Twist. Think of these poses not as a rigid prescription, but as a customizable toolkit you can reach for whenever your back starts sending out those all-too-familiar SOS signals.
We've covered the gentle flexion of Cat-Cow, the full-body lengthening of Downward-Facing Dog, and the supportive backbend of Sphinx Pose. Each stretch offers a unique pathway to relief, targeting the intricate network of muscles, ligaments, and nerves that contribute to a happy, healthy spine. The real magic, however, isn't in knowing these poses; it's in consistently practicing them with mindfulness and precision.
Let's be honest, the biggest hurdle isn't learning a pose, it's sticking with it. The secret to transforming your lower back health from a constant source of frustration into a bastion of strength lies in two key principles: consistency and awareness.
A five-minute daily practice, done with intention and correct alignment, is infinitely more powerful than a grueling hour-long session once a month.
Your goal isn't to force your body into a perfect pretzel shape. It's about showing up on your mat, breathing deeply, and listening to what your body needs today. Some days, that might mean a long, restorative Child's Pose. Other days, you might feel energized enough for a few rounds of Bridge Pose. The key is to build a sustainable habit.
You are now equipped with the "what" and the "how." The next step is to integrate this knowledge into your life. Don't let this be another article you read and forget. Let it be the catalyst for meaningful, lasting change.
Here are your actionable next steps:
Mastering these concepts isn't just about alleviating a temporary ache. It's about reclaiming your freedom of movement, improving your posture, and building a resilient foundation that will support you for years to come. It’s about being able to lift your groceries, play with your kids, or sit at your desk without that nagging, distracting pain. You have the power to build a stronger, more supple back, one mindful stretch at a time. Your mat is waiting for you.
Ready to eliminate the guesswork and ensure every stretch is safe and effective? The Dalm app uses medical-grade AI to analyze your form in real-time, providing instant voice feedback to perfect your alignment. Think of it as your personal yoga therapist, available 24/7 to guide you through the best yoga stretches for lower back with precision and care.


