8 Unbeatable Core Strengthening Yoga Poses for 2025

8 Unbeatable Core Strengthening Yoga Poses for 2025

8 Unbeatable Core Strengthening Yoga Poses for 2025

Forget endless crunches. The secret to a stable, powerful yoga practice and a healthier back isn't about getting a six-pack, it's about building deep, functional core strength. Your core is the epicenter of your movement, the vital bridge connecting your upper and lower body. It provides the stability you need for everything from balancing in Tree Pose to flowing gracefully through a vinyasa. When your core is engaged, you move with more confidence, precision, and power.

This guide cuts through the noise to bring you the definitive list of the most effective core strengthening yoga poses that deliver real, tangible results. We are skipping the fluff and getting straight to the good stuff. You'll learn exactly how to execute each posture, understand its unique benefits, and discover practical modifications to meet you where you are today.

We'll break down everything from foundational holds like Plank to dynamic flows that challenge your stability. Get ready to transform your practice from the inside out and unlock a new level of strength and control you never thought possible. This isn't just about building muscle; it's about building a smarter, more integrated body. Let's dive in.

1. Plank Pose (Phalakasana)

Ah, the Plank Pose, or Phalakasana. If core strengthening yoga poses had a rockstar, this would be it. Plank is the quintessential isometric exercise where you hold your body in a straight, rigid line, like a plank of wood. It's deceptively simple: you just hold still. But ask anyone who’s held one for more than 30 seconds, and they’ll tell you it’s a full-body crucible that forges a powerhouse core. This pose is a non-negotiable for building deep abdominal strength, targeting the rectus abdominis (your six-pack muscles), transverse abdominis (your inner corset), and obliques.

A person holds a plank pose on a green yoga mat, demonstrating core strength and focus.

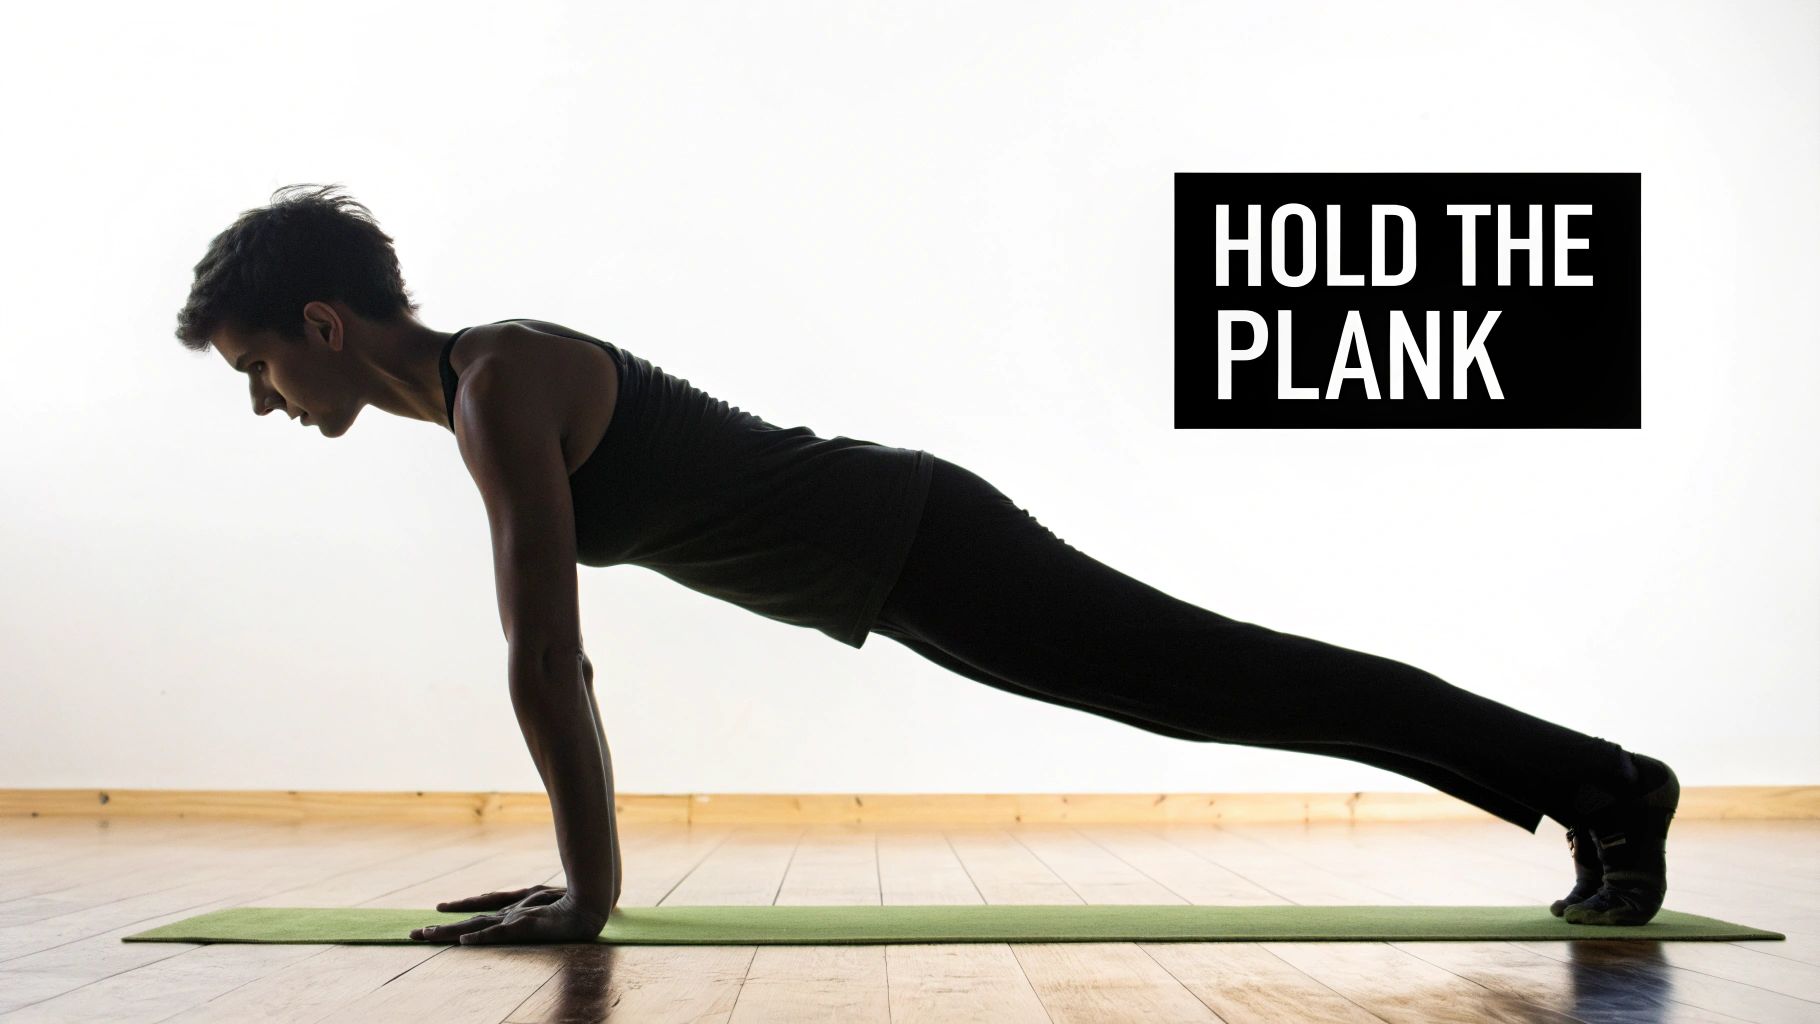
This pose has exploded beyond yoga studios, becoming a staple in military fitness tests, physical therapy clinics for core rehabilitation, and every fitness influencer's "ab challenge" on social media. Its popularity stems from its incredible efficiency and accessibility. You don’t need any equipment, just a few feet of floor space and a will of steel.

How to Master Your Plank

Ready to feel the burn? Here’s the step-by-step to a perfect Plank:

  1. Get into Position: Start on all fours, with your hands directly under your shoulders and your knees under your hips.
  2. Extend Your Legs: Step one foot back, then the other, coming onto the balls of your feet. Your body should form a straight line from your head to your heels.
  3. Engage Everything: This is the secret sauce. Actively press the floor away with your hands, engage your quads, and squeeze your glutes. Most importantly, draw your navel toward your spine to fire up your transverse abdominis.
  4. Hold and Breathe: Keep your gaze slightly forward on the floor to maintain a neutral neck. Breathe steadily and hold for your desired time.

Pro Tip: Imagine a cup of tea resting on your lower back. Your goal is to keep your core so stable that you wouldn't spill a single drop. Avoid dropping your hips or raising your butt to the ceiling.

Plank Variations and Tips

  • Wrist Relief: If you have sensitive wrists, switch to a Forearm Plank. The rules are the same, but you’ll rest on your forearms with your elbows directly under your shoulders.
  • Start Small: New to planks? Begin with 20-30 second holds and gradually increase the duration as you get stronger. Consistency is key.
  • Warm-Up First: Plank demands a lot from your body. Make sure you're properly prepared by performing some foundational movements. You can find excellent routines in our guide to yoga warm-up exercises to get your muscles ready for action.

2. Boat Pose (Navasana)

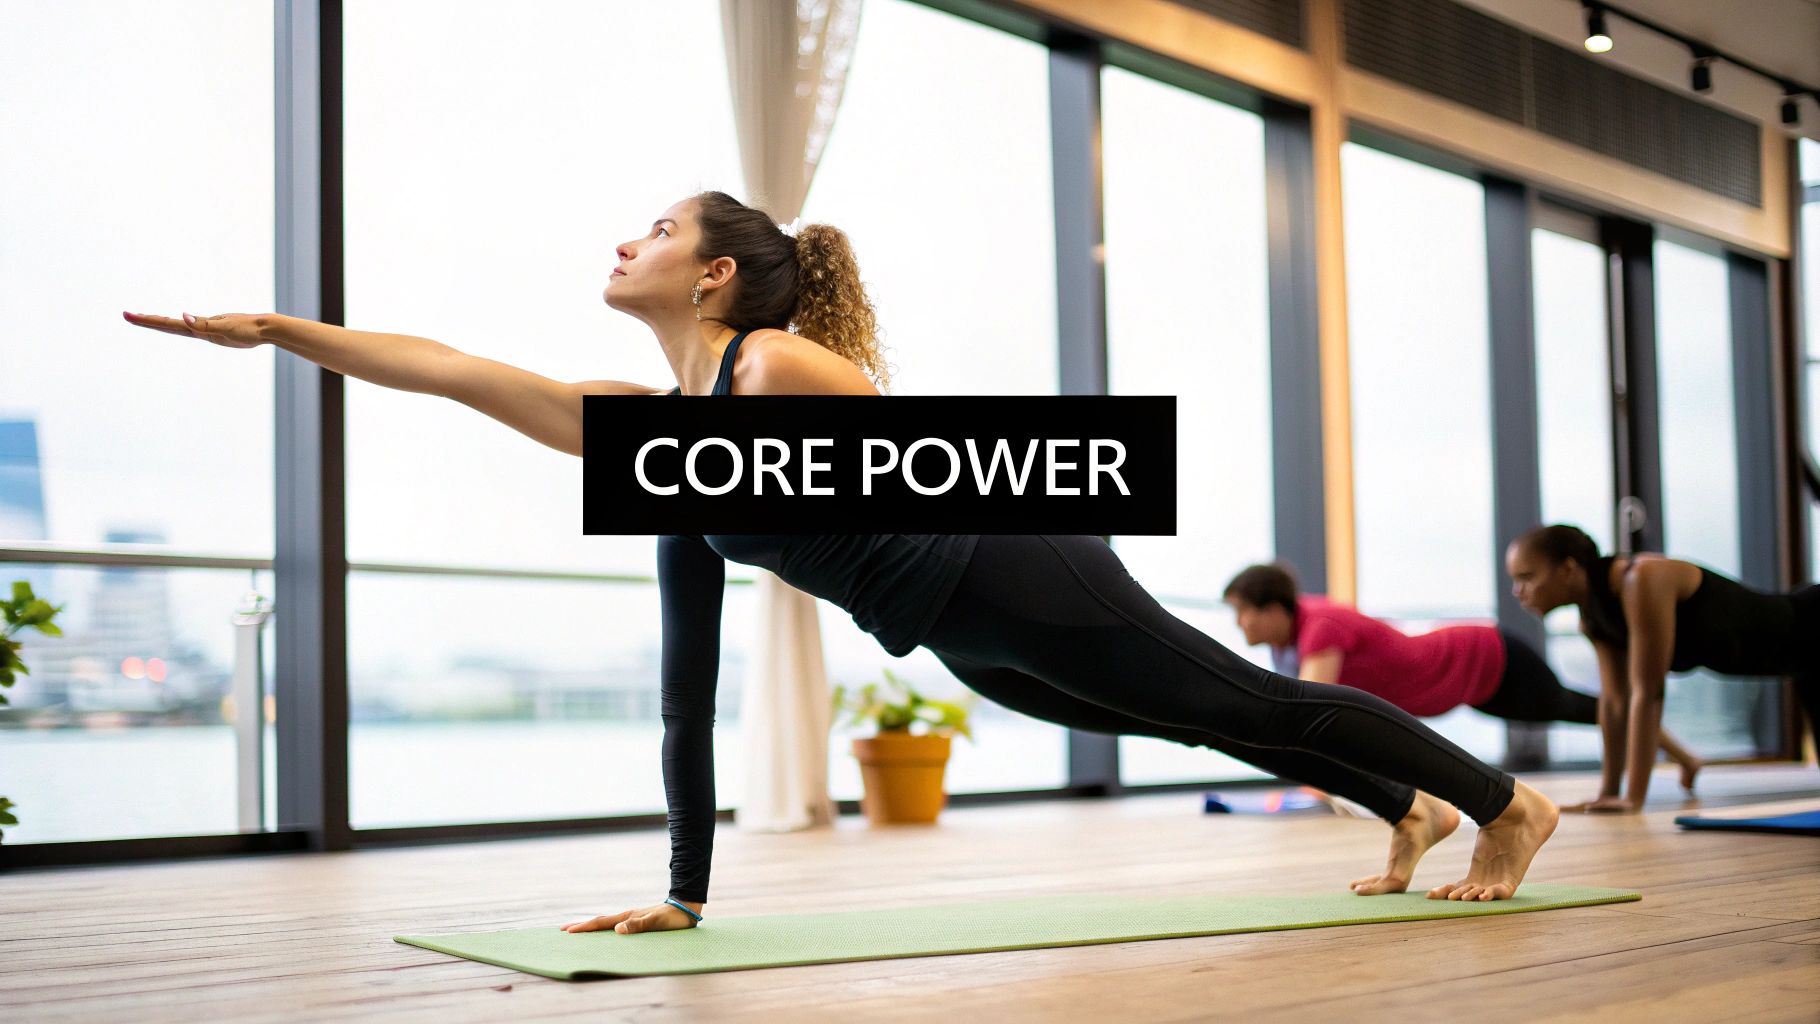
Get ready to rock the boat with Navasana. This pose is the ultimate test of core stability and endurance, turning your body into a V-shape that challenges your abdominal muscles, hip flexors, and balance. While Plank is a static hold of strength, Boat Pose is an active, dynamic challenge that forces your core to fire on all cylinders to keep you from capsizing. It's a true core furnace that intensely targets the deep rectus abdominis and transverse abdominis muscles.

A woman performs boat pose on a green yoga mat, demonstrating core strength.

This pose is a cornerstone of modern Vinyasa flow classes, often appearing as a peak posture to test students' grit. You'll also see it featured in arm balance training programs to build the foundational strength needed for more advanced asanas. Its power lies in its ability to build both muscular strength and the mind-body connection required for intense balance work.

How to Master Your Boat

Ready to set sail? Here’s your step-by-step guide to a buoyant Boat Pose:

  1. Get into Position: Start seated on your mat with your knees bent and feet flat on the floor. Place your hands slightly behind your hips for support.
  2. Lift and Engage: Keeping your spine long and chest lifted, lean back slightly. Engage your core by drawing your navel in, then lift your feet off the floor, bringing your shins parallel to the ground.
  3. Find Your Balance: Balance on your sitting bones. Once you feel stable, extend your arms forward, parallel to the floor. For the full expression, straighten your legs to create a V-shape with your body.
  4. Hold and Breathe: Keep your gaze forward and breathe deeply and evenly. Hold the pose for your desired time, maintaining a proud, open chest.

Pro Tip: Avoid rounding your spine. The goal is to create a "V" shape, not a "C" shape. If you feel your lower back slumping, it's a sign to modify the pose. Think "lift the heart" to keep your posture tall.

Boat Pose Variations and Tips

  • Modify for Stability: If you're just starting, keep your knees bent or lightly hold the backs of your thighs for support. You can also keep your toes lightly tapping the floor.
  • Start with Short Holds: This is a demanding pose. Begin with holds of 15-20 seconds and focus on perfect form before increasing the duration.
  • Build Your Foundation: Boat Pose requires a baseline of core strength. If you're new to this practice, you can get started with our introductory guide on yoga for core strength for beginners to build up to it.

3. Four-Limbed Staff Pose (Chaturanga Dandasana)

Enter the dragon of yoga poses: Chaturanga Dandasana, the Four-Limbed Staff Pose. If Plank is the steadfast foundation, Chaturanga is the fiery transition that tests your limits. This pose is essentially a yoga push-up hold, demanding immense strength from your core, chest, shoulders, and arms. It's the critical link in a Vinyasa flow, connecting Plank to Upward-Facing Dog, and it's where core stability is truly forged under pressure. It intensely targets your entire abdominal wall, requiring you to keep your midsection as rigid as a steel beam while hovering just inches off the floor.

This pose is a cornerstone of modern Vinyasa and Ashtanga yoga, taught in virtually every teacher training program as a fundamental element of dynamic practice. Its reputation is well-earned; mastering Chaturanga signifies a new level of physical integration and control. It’s not just about brute strength, but about the intelligent engagement of your entire body, led by a powerful and unwavering core.

How to Master Your Chaturanga

Ready to embrace the challenge? Here’s the step-by-step to a solid Chaturanga:

  1. Start in Plank: Begin in a strong Plank Pose, with your shoulders stacked directly over your wrists and your body in one straight line.
  2. Shift and Lower: Inhale and shift your weight slightly forward, so your shoulders move past your wrists. As you exhale, bend your elbows straight back, keeping them hugged tightly against your ribcage.
  3. Hold the Hover: Lower your body until your shoulders are in line with your elbows, creating a 90-degree angle. Your body should remain a straight, hovering line parallel to the floor.
  4. Engage and Breathe: Keep your core fiercely engaged, your legs active, and your neck long. Hold for a breath before transitioning to your next pose.

Pro Tip: Think of your body as a single, solid unit. The moment you feel your hips sag or your chest collapse, you’ve lost the core connection. It's better to modify than to practice with poor form.

Chaturanga Variations and Tips

  • Knees Down: The best modification for building strength is to drop your knees to the mat from Plank. From there, perform the same shift-and-lower action. This allows you to build upper body and core strength safely.
  • Hug It In: The most common mistake is letting the elbows flare out to the sides. Actively squeeze your elbows toward your midline. This protects your shoulder joints and properly engages your triceps and chest.
  • Avoid the Dip: Never let your shoulders dip lower than your elbows. This puts immense strain on the rotator cuff. Use a mirror or record yourself to check your alignment.

4. Locust Pose (Salabhasana)

Meet Locust Pose, or Salabhasana, the unsung hero of core strengthening yoga poses. While many core exercises focus on the front of the body, Locust turns the tables by firing up your entire posterior chain. This powerful backbend has you lie on your stomach and lift everything off the floor, creating an arc with your body. It's like doing a "superman" pose, but with the focused intention of a yogi. This pose is a masterclass in strengthening the deep muscles that support your spine, your glutes, and the back of your core.

This pose is a cornerstone of traditional Hatha yoga sequences, prized for its ability to build back strength and counterbalance the effects of sitting and forward folding. Its focus on the posterior core has also made it a favorite in functional fitness circles and physical therapy for improving posture and stabilizing the spine. It proves that a truly strong core is strong on all sides.

How to Take Flight in Locust

Ready to build a back of steel? Here’s how to perform a perfect Locust Pose:

  1. Get into Position: Lie on your belly with your legs together and your arms alongside your body, palms facing up. Rest your forehead on the mat.
  2. Prepare for Liftoff: Squeeze your glutes and engage your lower abdominals, pressing your pubic bone gently into the mat. This stabilizes your lower back.
  3. Lift and Extend: On an inhale, lift your head, chest, arms, and legs off the floor. Keep your arms parallel to the ground and reach back through your fingertips and toes.
  4. Hold and Breathe: Keep your gaze down or slightly forward to maintain a neutral neck. Breathe steadily into your chest and hold the pose, feeling the engagement from your upper back to your heels.

Pro Tip: Think "length, not height." Instead of trying to lift as high as you can, focus on lengthening your body from the crown of your head through your toes. This creates space in the spine and prevents compression.

Locust Variations and Tips

  • Go One by One: If lifting everything at once is too much, start with a Half Locust. Keep your upper body on the floor and lift just one leg at a time, then switch.
  • Arm Placement: For a different challenge, try interlacing your fingers behind your back. This helps open the chest and shoulders more deeply as you lift.
  • Build Endurance: Start by holding for just 15-20 seconds. As you build strength, gradually work your way up to longer holds. The key is consistent, controlled engagement.

5. Bridge Pose (Setu Bandhasana)

Let's lift things up with Bridge Pose, or Setu Bandhasana. While it’s famous for toning the glutes and opening the chest, this gentle backbend is a secret weapon among core strengthening yoga poses. Bridge Pose requires you to fire up your entire posterior chain, including your glutes and hamstrings, while simultaneously engaging your deep abdominal muscles to lift and stabilize your hips. It’s a masterclass in using your core for support rather than just for crunches.

This pose is a cornerstone of Hatha and restorative yoga traditions but has also been adopted by physical therapists and fitness coaches for its incredible ability to strengthen the lower back and activate underused glute muscles. It proves that you don't need aggressive movements to build a powerful, functional core; sometimes, the most effective work is done while lying on your back.

How to Build Your Bridge

Ready to elevate your core workout? Here’s how to perform a perfect Bridge Pose:

  1. Get into Position: Lie on your back with your knees bent and your feet flat on the floor, hip-width apart. You should be able to just graze your heels with your fingertips. Rest your arms alongside your body, palms down.
  2. Lift Off: Press firmly through your feet and palms. As you exhale, engage your core and glutes to lift your hips off the floor toward the ceiling.
  3. Engage and Align: Keep your thighs and inner feet parallel. Squeeze your glutes and draw your navel toward your spine to support your lower back. Your body should form a straight line from your shoulders to your knees.
  4. Hold and Breathe: Hold the position, breathing steadily into your belly and chest. To come down, slowly lower your spine to the floor one vertebra at a time.

Pro Tip: Imagine you are squeezing a yoga block between your thighs. This will help keep your knees from splaying out and deepen the engagement in your inner thighs and core.

Bridge Variations and Tips

  • Go Deeper: For a deeper chest opener, clasp your hands together on the mat beneath your back, rolling your shoulders underneath you.
  • Add a Challenge: For more intensity, try a Single-Leg Bridge. From your standard Bridge, extend one leg straight up toward the ceiling, keeping your hips level.
  • Mind Your Neck: Keep your gaze fixed on the ceiling and avoid turning your head from side to side to protect your neck.

6. Side Plank Pose (Vasisthasana)

If Plank is the rockstar, Side Plank, or Vasisthasana, is the lead guitarist shredding a face-melting solo. This pose takes the stability challenge to a new level, forcing you to balance on one arm and the side of one foot. It's a unilateral powerhouse that specifically targets the obliques (the muscles on the sides of your waist) and deep core stabilizers like the quadratus lumborum. Think of it as sculpting the sides of your core while building incredible shoulder and wrist strength.

Woman demonstrating a side plank exercise for core strength on a green yoga mat.

This pose has become a favorite not just in vinyasa flow classes but also in functional fitness and Pilates, prized for its ability to build lateral core strength essential for rotational movements and preventing back pain. It's a true test of balance, concentration, and pure grit, making it one of the most effective core strengthening yoga poses you can do.

How to Master Your Side Plank

Ready to defy gravity? Here’s your step-by-step guide to a solid Side Plank:

  1. Get into Position: Start in a standard Plank Pose (Phalakasana). Ensure your shoulders are directly over your wrists.
  2. Transition and Stack: Slowly shift your weight onto your right hand and the outer edge of your right foot. Stack your left foot directly on top of your right.
  3. Engage and Lift: Press firmly through your right hand to create space between your shoulder and ear. Lift your hips high, engaging your obliques to prevent any sagging. Your body should form one long, diagonal line.
  4. Hold and Breathe: Extend your left arm toward the ceiling and turn your gaze up to your left fingertips if it feels comfortable for your neck. Breathe steadily and hold. Repeat on the other side.

Pro Tip: Imagine a string pulling your top hip straight up toward the ceiling. This mental cue will help you keep your hips lifted and your obliques fired up, preventing your core from collapsing.

Side Plank Variations and Tips

  • Build Your Foundation: If stacking your feet feels too wobbly, modify by staggering them, placing your top foot on the floor in front of your bottom foot for a wider base.
  • Knee-Down Variation: For a gentler version, drop your bottom knee to the mat, keeping it directly under your hip. This is a fantastic way to build strength before progressing to the full pose.
  • Hold Times: Start with holds of 15-20 seconds per side, focusing on perfect form. As you build confidence and strength, work your way up to longer holds.

7. Downward-Facing Dog to Plank Flow (Adho Mukha Svanasana to Plank)

Why settle for one static pose when you can get a two-for-one core-scorching special? The Downward-Facing Dog to Plank Flow is less of a single pose and more of a dynamic conversation between two foundational yoga postures. This transition is the secret weapon of Vinyasa yoga, turning a simple movement into a rhythmic, strength-building exercise that challenges your core stability with every breath. It’s the engine that powers Sun Salutations and a staple in nearly every flow class on the planet.

This flow isn't just about moving from point A to point B; it's about the journey. As you shift your body from an inverted V-shape to a straight line, your deep core muscles, especially the transverse abdominis, work overtime to control the movement and stabilize your spine. This continuous engagement makes it one of the most effective and functional core strengthening yoga poses, building control and endurance simultaneously.

How to Master Your Flow

Ready to ride the wave? Here’s how to nail this powerful transition:

  1. Start in Downward-Facing Dog: Begin in an inverted V-shape, pressing your hands firmly into the mat and lifting your hips toward the ceiling.
  2. Inhale and Shift Forward: On an inhale, begin to ripple your spine forward, bringing your shoulders over your wrists.
  3. Arrive in Plank: Land in a strong Plank Pose, with your body forming a straight, solid line from your head to your heels. Keep your hips in line with your shoulders, avoiding any sagging.
  4. Exhale and Return: On an exhale, press the floor away and lift your hips back up and back, returning to Downward-Facing Dog.

Pro Tip: Sync your movement with your breath. Use the entire length of your inhale to move into Plank and the entire exhale to return to Downward-Facing Dog. This mindful pacing prevents momentum from taking over and forces your core to do the work.

Flow Variations and Tips

  • Slow it Down: Move as slowly as you can through the transition. This deliberate pacing maximizes time under tension for your core muscles, leading to greater strength gains.
  • Add a Push-Up: For an extra challenge, add a Chaturanga or knee-chest-chin push-up after you arrive in Plank before exhaling back to Downward-Facing Dog.
  • Build Your Sequence: This flow is a fundamental building block. To understand how it fits into a larger practice, explore our guide on yoga sequencing for beginners and learn how to create your own core-focused routines.

8. Leg Raises (Urdhva Mukha Paschimottanasana variation)

If the Plank Pose is the king of static core holds, then Leg Raises are the dynamic duke of lower abdominal development. This yoga-inspired movement isn't about flashy acrobatics; it's a controlled, deliberate exercise that zeroes in on the often-neglected lower rectus abdominis and deep transverse abdominis. Lying on your back, you methodically lift and lower your legs, creating a powerful contraction that builds formidable core strength from the ground up.

This pose has become a cornerstone of modern yoga fitness classes and core-focused workouts for a good reason. It directly addresses the area where many people struggle with core stability and strength. Its focused burn is a testament to its effectiveness, making it a favorite among physical therapists for core rehabilitation and bootcamp instructors looking to deliver serious results.

How to Master Your Leg Raises

Ready to chisel those lower abs? Here’s how to do it right:

  1. Get into Position: Lie flat on your back with your legs extended straight out in front of you. You can place your hands under your lower back for support or keep them by your sides, palms down.
  2. Engage Your Core: Before you move, press your lower back firmly into the mat. Draw your navel in toward your spine to activate your deep core muscles. This is the most crucial step.
  3. Lift with Control: Inhale, and then as you exhale, slowly lift your legs toward the ceiling. Keep them as straight as possible without locking your knees. Stop when they are at a 90-degree angle or as high as you can go without your lower back lifting off the floor.
  4. Lower with Precision: Inhale as you slowly and with extreme control, lower your legs back down, stopping just before they touch the floor. Repeat for your desired number of reps.

Pro Tip: The magic is in the descent. The slower you lower your legs, the more your abdominal muscles have to work. Avoid using momentum; the entire movement should be powered by your core.

Leg Raise Variations and Tips

  • Protect Your Back: If your lower back arches, you've gone too far. Place your hands under your glutes for extra support or bend your knees slightly to reduce the load.
  • Bent-Knee Variation: New to this move? Start by performing the raise with your knees bent at a 90-degree angle. This shortens the lever and makes the exercise more accessible.
  • Focus on Form: Quality over quantity is the rule here. Aim for 8-15 slow, controlled repetitions with perfect form rather than trying to pump out dozens of sloppy ones.

8-Pose Core Strength Comparison

PoseImplementation complexity 🔄Resources & accessibility ⚡Expected outcomes ⭐Ideal use cases 📊Key advantages & tips 💡
Plank Pose (Phalakasana)Low — isometric hold, easy modificationsVery low — no equipment, anywhere⭐⭐⭐⭐ — core endurance & full-body stabilizationWarm-ups, rehab, daily core routinesEngages multiple muscle groups; shoulders over wrists, build duration gradually
Boat Pose (Navasana)Medium — requires balance and coordinationVery low — no equipment, scalable with props⭐⭐⭐⭐ — deep abdominal & hip‑flexor strengtheningVinyasa peaks, core-focused classes, balance trainingIntense lower‑ab work; start with bent knees, keep chest lifted
Four‑Limbed Staff (Chaturanga Dandasana)High — precise alignment and upper‑body strengthLow equipment, high strength requirement⭐⭐⭐⭐ — upper‑body and core power, push‑up prepVinyasa transitions, arm‑balance prep, strength trainingHug elbows to ribs, modify with knees down; risk of shoulder strain if misaligned
Locust Pose (Salabhasana)Medium — prone back extension, posterior strength neededVery low — no equipment⭐⭐⭐ — posterior chain, back extensors, posture improvementBalance forward‑bending sequences, posterior chain emphasisLift from core and glutes, keep neck neutral, start with arms at sides
Bridge Pose (Setu Bandhasana)Low–Medium — accessible with progressionsVery low — no equipment; blocks optional⭐⭐⭐⭐ — glute activation, hip extension, moderate core workBeginners, glute activation routines, prep for backbendsFeet hip‑width, squeeze glutes, avoid turning head; clasp hands under back to progress
Side Plank (Vasisthasana)Medium–High — one‑sided stability and balanceVery low — no equipment, scalable by lowering knee⭐⭐⭐⭐ — obliques & hip stabilizers, unilateral strengthOblique targeting, unilateral stability, functional trainingStack or stagger feet, ensure shoulder over wrist, modify by dropping bottom knee
Downward‑Facing Dog → Plank FlowMedium — dynamic coordination and breath syncVery low — no equipment⭐⭐⭐ — dynamic core control, warm‑up and enduranceVinyasa flows, sun salutations, HIIT yogaSynchronize breath, move deliberately, modify with knees/forearms
Leg Raises (supine variation)Medium — control of straight‑leg mechanicsVery low — no equipment⭐⭐⭐⭐ — targets lower abdominals and deep stabilizersCore strengthening sessions, lower‑ab focus, rehab with guidancePress lower back to floor, start with bent knees, avoid momentum

Your Next Move: Integrate, Analyze, and Evolve Your Core Practice

You’ve just journeyed through a powerhouse lineup of the best core strengthening yoga poses, from the foundational stability of Plank to the dynamic challenge of the Downward-Facing Dog to Plank Flow. We’ve broken down the "hows" and "whys" of each posture, giving you a detailed blueprint for building a core that’s not just aesthetically pleasing but functionally resilient, supporting every movement you make, both on and off the mat.

But let's be real: reading about perfect form is one thing. Executing it when you’re shaking in Boat Pose is another challenge entirely. The difference between a strong, engaged core and a strained lower back often comes down to micro-adjustments that are nearly impossible to self-diagnose. Are your hips truly lifted in Bridge Pose? Is your spine straight in Chaturanga, or are you inadvertently arching?

From Information to Transformation

This is where you graduate from simply doing the poses to truly mastering them. The next step in your journey isn't about adding more complex poses; it's about refining the fundamentals you’ve just learned with unparalleled precision. Consistent, mindful practice is the key to unlocking the profound benefits we've discussed, from improved posture and reduced back pain to enhanced balance and athletic performance.

Here are your actionable next steps to turn this knowledge into tangible strength:

  • Create a "Core Focus" Sequence: Don't just throw these poses into your practice randomly. Intentionally build a short, 15-minute sequence featuring three to four of these poses. For example, start with a Downward-Facing Dog to Plank Flow to warm up, move into Side Plank on each side, and finish with a few rounds of Boat Pose holds.
  • Focus on Quality Over Quantity: Instead of holding a shaky Plank for 60 seconds, aim for a perfectly aligned Plank for 30 seconds. A shorter duration with impeccable form builds functional strength far more effectively and safely than a longer, compromised hold.
  • Listen to Your Body’s Feedback: Pay close attention to which muscles are firing. In Locust Pose, can you feel your glutes and hamstrings engage to support your lower back? True core strength is a full-body conversation, not just an abdominal workout.

Evolve Your Practice with Intelligent Feedback

The most significant leap forward in your practice will come from receiving accurate, real-time feedback on your alignment. Without a private instructor guiding your every move, it’s easy to build bad habits or hit a plateau. This is precisely why integrating technology can be a revolutionary step. Imagine an AI-powered coach that analyzes your form with medical-grade precision, offering instant verbal cues to correct your alignment in Side Plank or stabilize your Boat Pose.

This isn't a futuristic concept; it's what the Dalm AI app provides. It acts as your digital spotter, ensuring every one of these core strengthening yoga poses is performed with maximum efficacy and safety. You can stop guessing and start knowing, transforming your home practice into a data-driven, results-oriented training session. By integrating these poses into a smart, consistent routine and leveraging tools that provide objective feedback, you’re not just strengthening your core. You are building a smarter, more intuitive, and powerfully resilient yoga practice from the inside out.


Ready to stop guessing and start building real, measurable core strength? The Dalm app provides medical-grade movement analysis and real-time voice coaching to perfect your form in every pose. Download Dalm today and transform your practice with the power of personalized AI feedback.

... more insights