
Proprioceptive Exercises for Balance to Build Unshakable Stability
Think of proprioceptive exercises for balance as a way to tune up your body’s internal navigation system. They’re specific movements that force the communication between your brain, nerves, and muscles to get sharper and faster. Essentially, you're giving your body's built-in "GPS" a major software upgrade to help you stay steady on your feet, avoid falls, and move with more confidence.
Have you ever misjudged a step, stumbled off a curb, and somehow managed to catch yourself before hitting the pavement? That wasn't just dumb luck. That was your proprioceptive system, the unsung hero of your body's balance and coordination.
This system is a complex network of tiny sensors—called proprioceptors—tucked away in your muscles, tendons, and joints. They're constantly chattering away, feeding your brain a live stream of data about where your limbs are, how they're moving, and how much effort they're using.
It’s this real-time feedback that allows you to walk through a dark room without crashing into furniture or touch your finger to your nose with your eyes closed. Your brain processes this stream of information and makes near-instant adjustments to keep you upright. When this feedback loop is firing on all cylinders, you move with a certain grace. When it's a bit fuzzy, you might feel clumsy or unsteady.
Like any skill, proprioception can get rusty. A past ankle sprain, a long-term injury, or even just sitting too much can dull this internal sense, leaving you with a compromised sense of balance. The signals between your body and brain get staticky, like a GPS trying to find a signal in the middle of nowhere.
This is exactly where proprioceptive exercises for balance come in. They’re designed to deliberately challenge that communication pathway. By putting yourself in slightly unstable situations, like standing on one foot or using a wobbly surface, you force your proprioceptors to wake up and work overtime.
Your brain is forced to sift through more complex data and send out lightning-fast, precise commands to your muscles to keep you from toppling over. This strengthens the entire system, making it more robust and responsive for real-world situations.
Sharpening this sense goes way beyond just preventing falls, even though that’s a massive plus. A finely tuned proprioceptive system leads to some incredible benefits:
When you do these exercises, you're not just building muscle; you're fundamentally upgrading the software that runs your movement. You're teaching your body to be smarter and more adaptable. But before we get into the "how," we need to figure out your starting point. Next up, we’ll walk through a few simple assessments to see where your balance is right now.
Before you start training like you're prepping for a Cirque du Soleil audition, you need a starting line. Think of this as your personal balance audit—a quick, honest look at where you're at right now. This isn't about judgment; it's about gathering some juicy data to see just how far you've come a few weeks from now.
But first, a quick word on not falling over. Do these checks in a clear space with something sturdy nearby, like a wall, a countertop, or the back of a solid chair. The goal is to test your balance, not your ability to break a fall. Safety first, always.
This one's a classic for a reason. It's the bread-and-butter of static balance assessment, and it tells you a surprising amount about your body's internal GPS.
Did you notice a big difference between sides? Totally normal. Most of us have a "hero" side and a "work-in-progress" side. Now you know which one needs a little extra love.
What's a Good Score? Holding steady for 30 seconds is a solid goal. If you find yourself bailing before the 10-second mark, it’s a big, flashing sign that your proprioceptive system is ready for a tune-up.
This test ups the ante by shrinking your base of support, forcing your brain and body to work together more precisely. It's the kind of stability you need for walking on a narrow trail or, you know, a curb.
These little tests are a direct window into your body’s knack for making constant, tiny adjustments to stay upright. And the good news is, you can get way better at it.
Before we move on, let's put these assessments into a handy table you can reference.
This table gives you a quick-glance guide to these at-home tests. Use it to establish your starting point and track how much your stability improves over time.
These simple checks give you a powerful baseline. It’s not just about a number on a stopwatch; it’s about understanding your body’s current language of balance.
And this isn't just wishful thinking; the science backs it up. A 2020 study focusing on older adults showed that a 12-week proprioceptive training program led to massive gains in their single-leg stance time and overall mobility, slashing their fall risk. You can see the full study for yourself to geek out on the data.
This is exactly the kind of real, measurable progress you can make at home. It's especially true when you use tools like Dalm, which provides AI-guided feedback on your form in balance-focused yoga poses, turning every session into a smart training opportunity.
Having these numbers in your back pocket transforms your practice from just "doing some exercises" into a clear mission. You've got a benchmark, and now you get to go out and crush it.
Alright, you've got your baseline. Now for the fun part. The best thing about your proprioceptive system is that it’s not set in stone; you can absolutely train it. With a few specific, deliberate movements, you can get your body and brain talking again, building a rock-solid foundation of stability from the ground up.
Think of these beginner exercises as learning the ABCs of balance. They aren't flashy or intense, but man, are they effective. The goal isn't to get sweaty—it's to tune in and feel the thousands of tiny, instantaneous adjustments your feet, ankles, and legs are making to keep you from toppling over.
Before you jump in, make sure your space is safe. Clear a little bubble around you and have a sturdy chair, wall, or countertop nearby. You might not need it, but it’s good to have a friend to lean on, just in case.
This one’s a classic for a reason. You might remember it from our self-check as the Tandem Walk, and it's a powerhouse for improving your balance while you're on the move. It forces you to stay stable on a super narrow base of support, which is exactly what you need when navigating tricky terrain in the real world.
The real magic here is in the precision. Every single step is a mini-conversation between your feet and your brain, sharpening your control.
This drill sneakily introduces a bit of controlled instability, teaching each leg how to support your entire body weight all by itself. It’s like a direct line to the proprioceptors in your standing ankle and hip, waking them up.
That little pause at the top is everything. It puts your muscles and brain under tension, forcing them to find a state of equilibrium. This is where the neuromuscular rewiring happens, teaching your body how to stay balanced when transitioning from one movement to another, like stepping over a curb.
We used this as a test, but it's also one of the most powerful proprioceptive exercises for balance you can possibly do. The trick is to keep it spicy by safely progressing the challenge.
Once you can comfortably hang out on one leg for 30 seconds without a major struggle, it’s time to level up. This handy flow chart shows you exactly how to approach it.
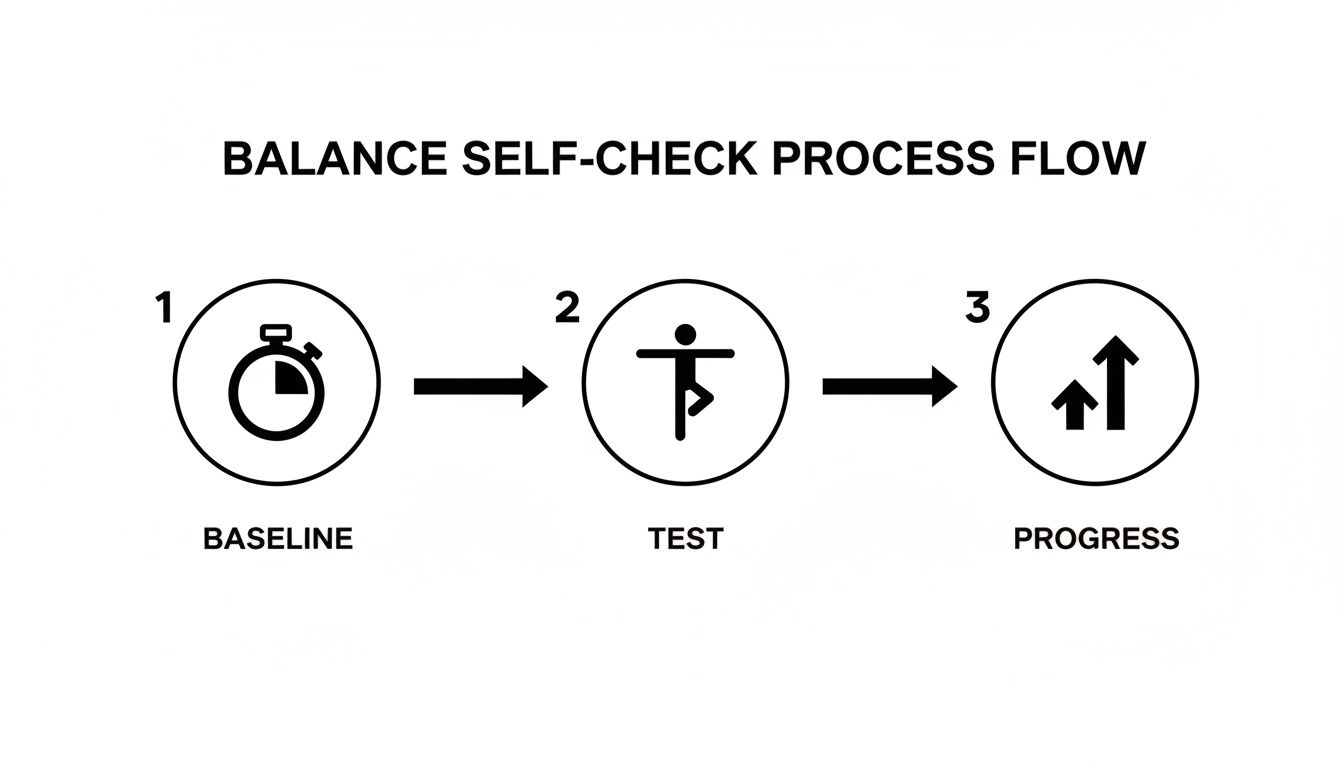
This simple cycle—baseline, test, progress—is your ticket to consistent improvement. It turns a basic move into a targeted training plan that actually works.
Here are a few ways to mix things up and challenge your single-leg stance:
Start with these foundational drills and practice them consistently, maybe a few times a week. You are actively rebuilding your body's internal GPS. For more ideas on how to weave this into a bigger picture, check out our complete guide on how to improve balance and stability. Once you master these, you'll be more than ready for the more dynamic challenges ahead.
So, you’ve mastered the basics and are feeling pretty steady on your feet. Fantastic. Now it's time to stir the pot a little. The intermediate level is all about introducing dynamic movement and slightly unpredictable surfaces. This is where your proprioceptive system learns to go from just maintaining balance to actively reclaiming it, moment by moment.
Think of these drills as training your body's rapid-response team—those tiny, lightning-fast muscular adjustments that keep you upright. This is the kind of functional stability that saves you on an icy sidewalk or when your dog makes a sudden lunge for a squirrel. We're moving beyond static holds and into the realm of real-world readiness.
This exercise is an absolute game-changer. It forces the proprioceptors in your standing foot, ankle, and hip to work overtime by combining a stable base (your standing leg) with controlled, dynamic movement.
Start by standing on one leg, keeping a soft bend in the knee. Picture a giant clock on the floor with you standing right in the middle.
Your goal is to complete 5-8 full "clock" taps on each leg for 2-3 sets. Seriously, the key here is slow, deliberate movement. If you're rushing, you’re just going through the motions and missing the point entirely.
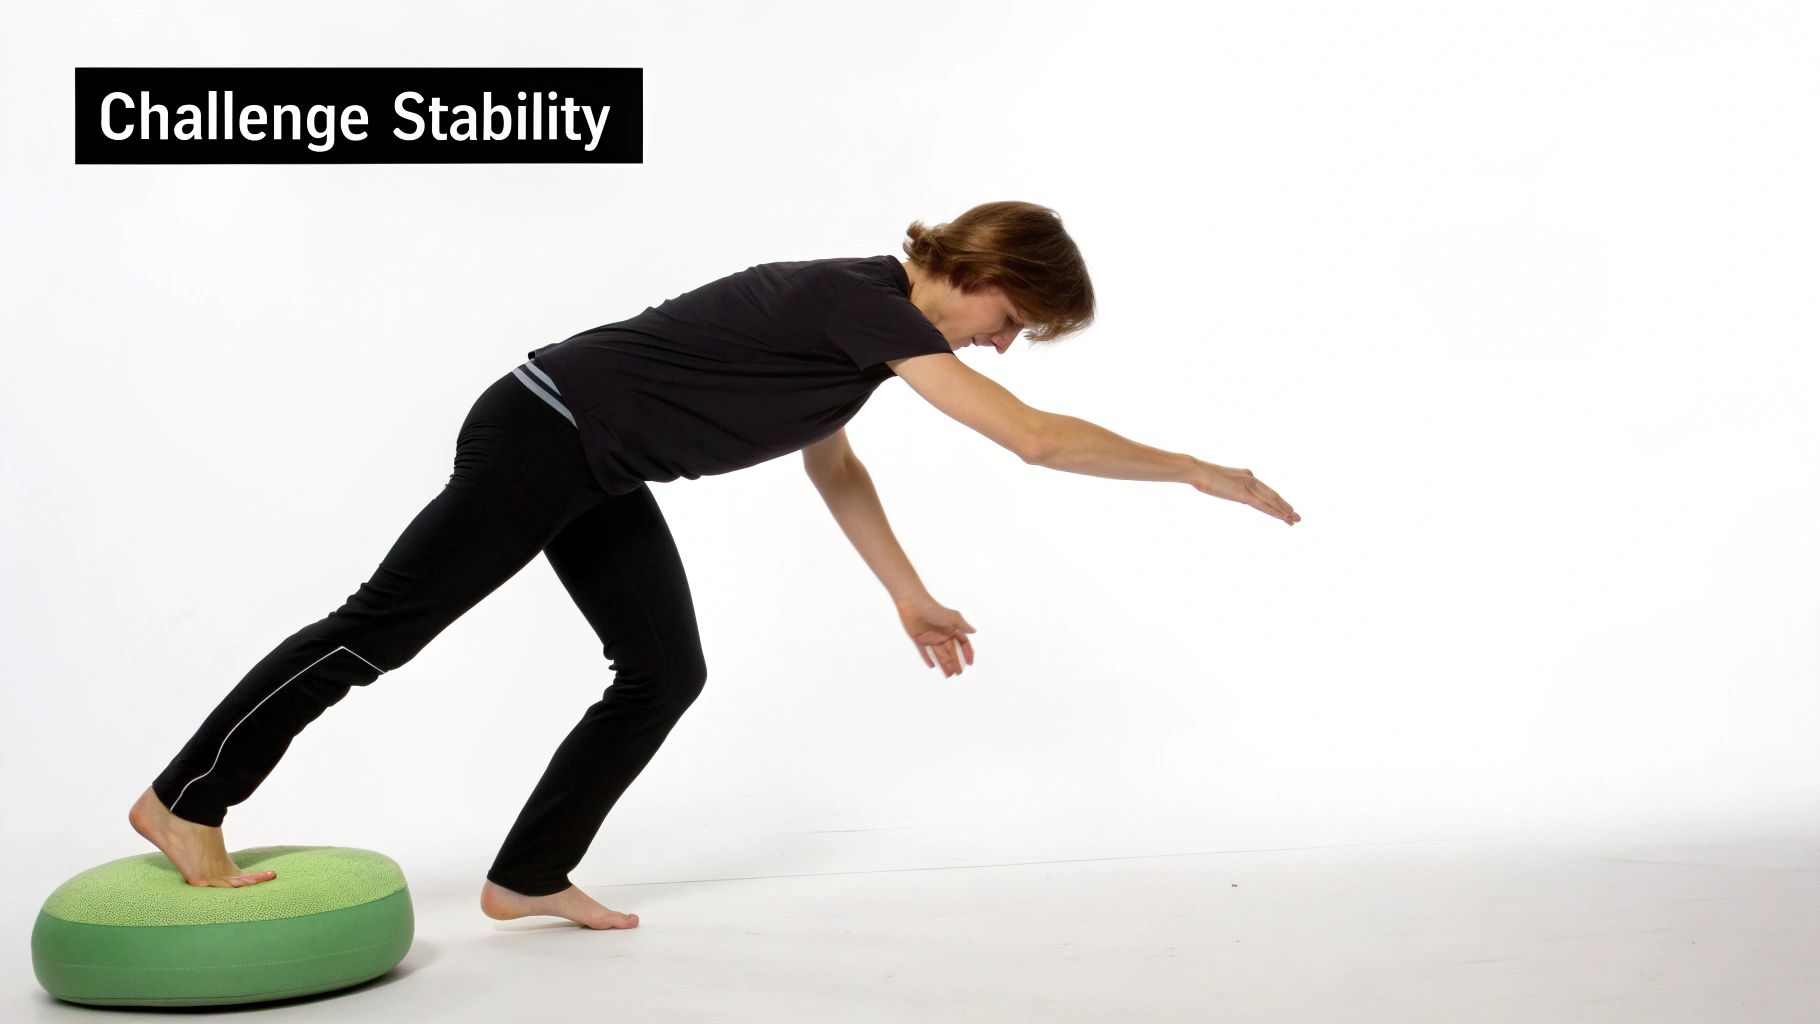
Ready for a real challenge? Let's pull the rug out from under you... literally. You don't need any fancy gym gear; a folded-up yoga mat, a thick couch cushion, or a firm pillow will work perfectly. Standing on an unstable surface is easily one of the most effective proprioceptive exercises for balance you can do.
When the ground beneath you is squishy and unpredictable, your brain can't just phone it in. It’s forced to tune in and listen intently to the feedback from your muscles and joints, which dramatically sharpens your body's internal GPS.
Just start by standing on the cushion with both feet. Once that feels somewhat manageable, try the single-leg stance you’ve already been practicing. Aim for a 20-30 second hold. You’ll feel every tiny muscle in your ankle working like crazy—that’s the magic happening!
This isn't just a party trick; it's backed by solid science. A comprehensive review of over 20 studies found that proprioceptive training on wobbly surfaces significantly boosted balance and postural control in athletes. It was even shown to slash the incidence of ankle sprains by up to 40% for soccer and basketball players by optimizing how their ankles responded to dynamic movements. You can dive into the research on proprioception's impact on sports performance if you want to geek out on the details.
Alright, let's put it all together. Once you can confidently stand on one leg on your cushion without toppling over immediately, it's time to add movement. This is where you really level up your intermediate training.
Pillow Marches
The Real Challenge: Your mission is to minimize the wobbles and keep your torso as upright and still as possible. This one demands intense focus and forces your core and standing leg to work in perfect harmony.
For an even bigger test, you can adapt many of our other balance improvement exercises for unstable surfaces.
By consistently practicing these intermediate drills, you're building a much more resilient and adaptive balance system. You're teaching your body to not just handle instability but to thrive in it, setting the stage for advanced challenges and peak performance.
So, you've conquered the intermediate drills and are feeling practically glued to the floor. Fantastic. Now, welcome to the big leagues. This is where we start building elite-level balance by throwing everything at your nervous system at once: dynamic movement, wobbly surfaces, and serious sensory curveballs.
The goal here isn't just about staying upright anymore. It’s about forging a body that's resilient, incredibly adaptive, and ready for whatever life—or your yoga mat—throws your way. These advanced proprioceptive exercises for balance are designed to push your neuromuscular system right to its edge, demanding intense focus and unshakable control.
Remember, quality over quantity is the name of the game. Slow and steady wins this race.
This one's the real deal—the ultimate test of single-leg stability and proprioceptive smarts. By combining a complex movement (the squat) with a completely unpredictable surface, you're forcing every tiny muscle from your toes to your core to work together in perfect harmony. Grab a firm pillow or a balance cushion to get started.
Try for 5-8 controlled reps on each leg for 2-3 sets. If you notice your knee caving inward or your form getting sloppy, just shorten the range of motion. This exercise is a game-changer for mastering tough yoga poses like Warrior III, building incredible strength and stability through a huge range of motion.
Life rarely happens in slow motion. You might need to step off a high curb unexpectedly, change direction in a pickup game, or just stick a landing from a small jump. These dynamic landing drills train your body to absorb force and find its balance in a split second. Think of it as teaching your body to react before your brain even has time to panic.
Start with small, low-impact hops. We're not going for airtime here.
Aim for 8-10 solid landings per leg. The focus is entirely on the quality and stability of each landing, not how far you can jump. These drills are less about cardio and more about hardwiring your nervous system for lightning-fast responses.
This isn't just about athletic performance; it has profound real-world benefits, especially as we get older. A fascinating 2021 study showed that after just 12 weeks of this kind of training, older adults saw dramatic improvements in their balance, with a whopping 70% reporting they felt less afraid of falling. That’s a huge deal when you consider that falls impact 37.3 million older individuals across the globe every year. For a deeper dive, you can check out the full study on proprioceptive training's impact.
Think of these advanced exercises as building a truly bulletproof system. This is where tools like Dalm can really shine. The app's medical-grade pose analysis gives you real-time feedback during challenging poses, essentially tracking your stability improvements just like the participants in that study—but from the comfort of your living room. You're not just getting stronger; you're building a safer, more confident future, one balanced movement at a time.
Jumping into something new always brings up a few questions. That's a great sign! It means you're already thinking like an expert. Let's tackle some of the most common things people wonder about when they start training their balance.
When it comes to rewiring your nervous system, consistency beats intensity every single time. You'll want to aim for about 10-15 minutes of these balance drills, maybe 3-5 times a week.
The whole point isn't to get sweaty or burn out your muscles. Think of it more like practicing an instrument. A little bit of focused, regular practice goes a lot further than one marathon session on a Sunday. You're giving your brain the consistent input it needs to build and reinforce those super-important neural connections.
Everyone's journey is a little different, but most people start to feel a real change within a few weeks of sticking with it. At first, it's the small stuff you'll notice—like feeling more solid when you hop out of bed or not catching your toe on that one uneven bit of pavement you always seem to find.
Look, you're not going to feel like a tightrope walker overnight, and that's okay. What you're doing here is fundamentally rewiring the connection between your body and your brain. Progress feels slow at first, but then it picks up speed as those new pathways get stronger.
Give it about 4-6 weeks, and the improvements should be pretty clear. Go back and try those self-assessment tests from the beginning. Nothing motivates you more than seeing that single-leg stance time shoot up!
Oh, absolutely! In fact, if you don't feel at least a little bit wobbly, the exercise is probably too easy for you. That shaky feeling is precisely the point—it's the signal that your internal sensors are getting a real workout, forcing your brain and muscles to start communicating better to find your center.
The trick is knowing the difference between a good wobble and a bad one.
Always stay in that "controlled challenge" zone. Don't be too proud to use a wall or a chair for a bit of support until your wobbles start to feel less like an emergency.
Yes! This is hands-down one of the biggest payoffs of proprioceptive training. Study after study has shown that sharpening your proprioception dramatically cuts your risk of joint injuries, especially in your legs. For example, some research on athletes found that dedicated balance training can slash the rate of ankle sprains by as much as 40%.
When your system is dialed in, your body’s reaction time is incredible. It can respond to an uneven patch of grass or a sudden twist in a split second. Your muscles will fire to protect the joint before your conscious brain even knows what happened. It’s like installing an internal bodyguard for your ankles and knees.
This is a huge one, and the answer is a firm: it depends. If you're coming back from an injury, you absolutely must chat with your physical therapist or doctor before you start. They'll know your specific situation and can give you the green light.
That said, proprioceptive work is often a cornerstone of rehab. It’s how you re-establish that mind-body link that gets scrambled after an injury. The key is to take it slow, listen carefully to what your body is telling you, and never, ever push through sharp pain.
Start with the most basic, supported versions of the exercises. Your goal is to gently and safely rebuild both your stability and your confidence.
Ready to see how all this works in your own practice? Dalm uses AI to give you real-time feedback on your yoga poses with medical-grade precision. It’s like having a balance expert guiding you toward better alignment and rock-solid stability. You can track your progress, see your improvements, and build a smarter, more balanced body.


