The 8 Best Yoga Poses for Knee Strengthening in 2025

The 8 Best Yoga Poses for Knee Strengthening in 2025

The 8 Best Yoga Poses for Knee Strengthening in 2025

Are your knees screaming for a break after a long run, a tough workout, or just a day of errands? You're not alone. Knee pain can feel like a life sentence, sidelining you from the activities you love. But what if the secret to resilient, pain-free knees wasn't in a bottle, but on your yoga mat? This isn't just about gentle stretching; it's about strategic strengthening.

We're diving into a curated list of the top 8 yoga poses for knee strengthening, specifically designed to build a muscular fortress around your joints. Forget aimless stretching. These poses are powerhouses, meticulously chosen to target the quadriceps, glutes, and hamstrings, the key support system for your knees. By reinforcing these muscles, you create a natural brace that absorbs impact and provides stability, reducing the strain on the joint itself.

This is your actionable blueprint. We’ll break down each pose with crystal-clear, step-by-step instructions. We will also expose common alignment mistakes that could do more harm than good, and offer smart modifications for every fitness level, from total beginner to seasoned yogi. You'll learn how to sequence these postures for maximum benefit and even discover how innovative AI feedback tools can help perfect your form. Forget generic advice. It's time to build stronger, more durable knees, one pose at a time. Let’s get started.

1. Chair Pose (Utkatasana)

Ah, Chair Pose. The pose we all love to hate, yet our knees secretly adore. Utkatasana, which translates to "Powerful Pose," is essentially you pretending to sit in an invisible chair. While it might feel like your quads are staging a fiery protest, this pose is a powerhouse for building the muscular support system your knees have been dreaming of. It strengthens the quadriceps, hamstrings, and glutes, creating a stable, fortified structure around the entire knee joint. This isn't just about building strength; it's about building smart, functional stability that protects you in everyday life.

Think of it as strength training disguised as yoga. This pose builds muscular endurance and proprioception, which is your body's ability to sense its position in space. Better proprioception means less chance of awkward twists and turns that can lead to injury. For anyone looking for yoga poses for knee strengthening, Utkatasana is the non-negotiable starting point.

A person performs a squat on a yoga mat outdoors, demonstrating a pose for leg strength.

Why It's a Knee-Strengthening MVP

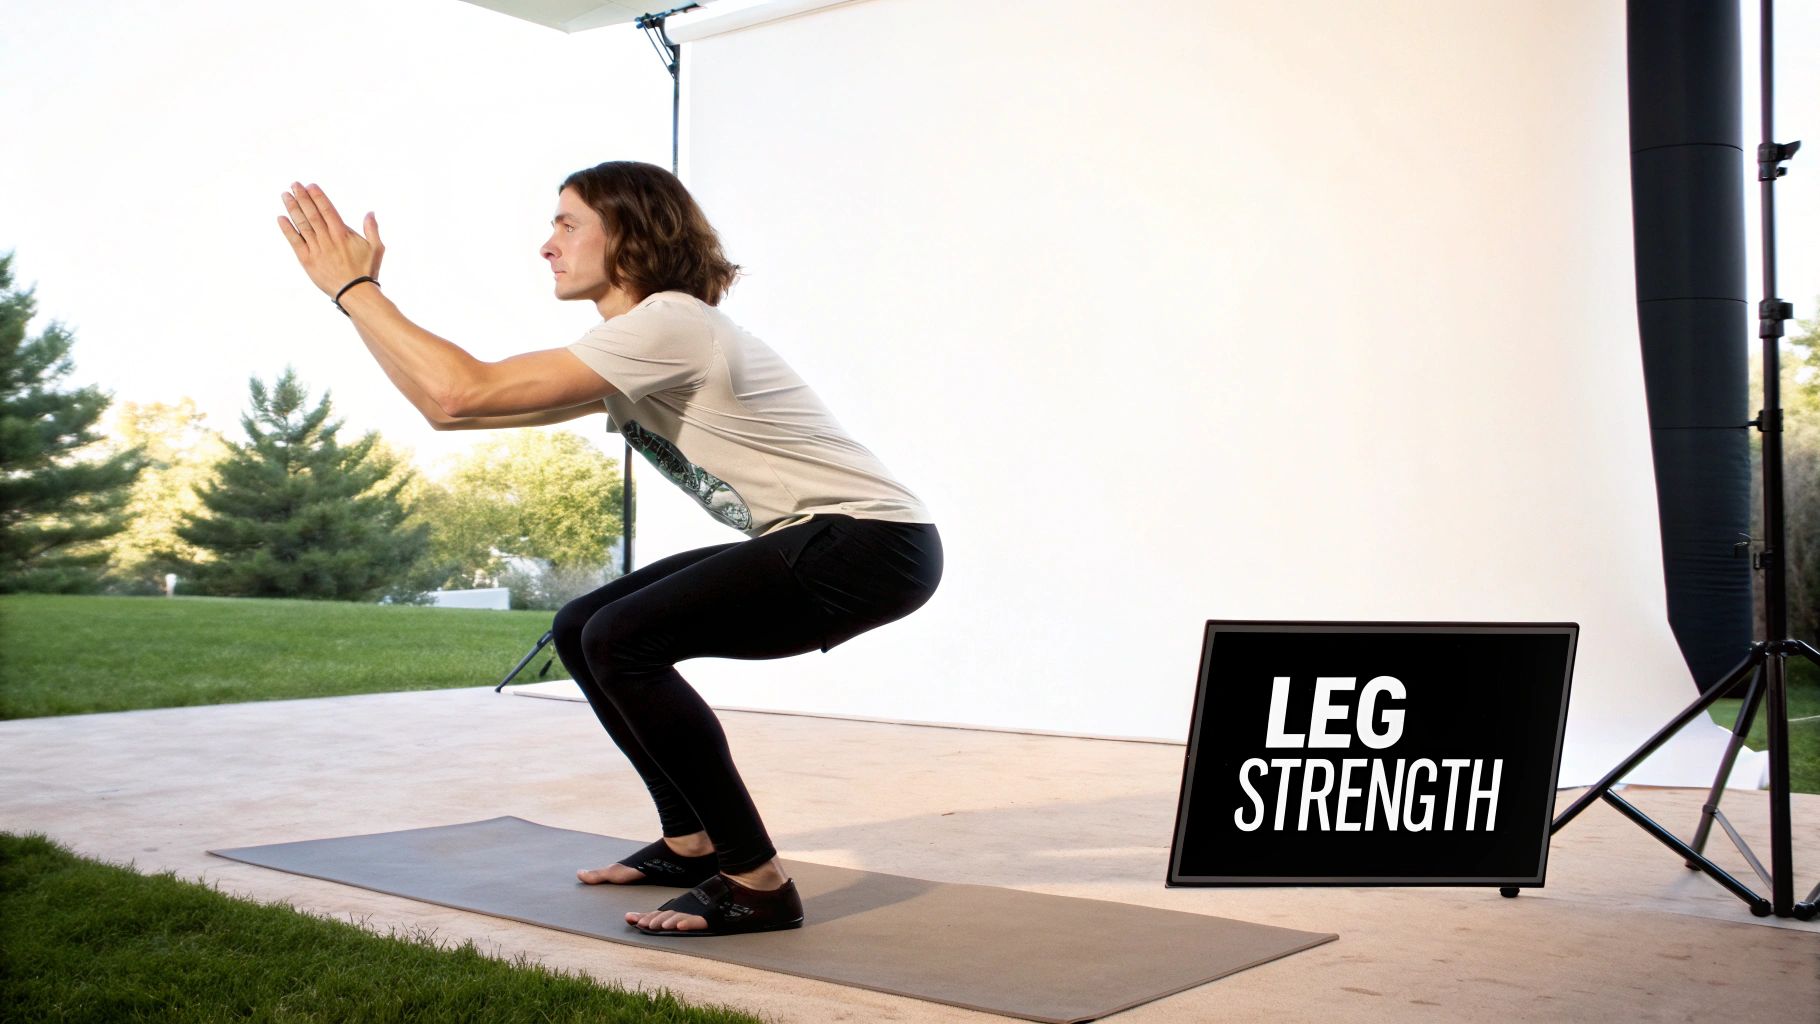
Chair Pose forces the major muscles of your legs to co-contract, creating a stabilizing "muscular corset" around the knee. This is why you'll see it used everywhere from athletic training to physical therapy clinics for ACL rehabilitation. It teaches your legs to work as an integrated unit, which is crucial for preventing injuries during dynamic movements like running or jumping.

How to Sit in Your Invisible Throne

  1. Start Strong: Begin in Mountain Pose (Tadasana) with your feet together or hip-width apart.
  2. Take a Seat: Inhale and raise your arms overhead, palms facing each other. Exhale and bend your knees, sinking your hips back and down as if sitting in a chair.
  3. Check Your Form: Glance down. You should be able to see your toes. If not, shift your weight further back into your heels. Your knees should be tracking in line with your middle toes.
  4. Engage Everything: Draw your navel toward your spine to engage your core, and keep your chest lifted. Relax your shoulders away from your ears.
  5. Hold On: Breathe deeply and hold for 30-60 seconds. To release, inhale and straighten your legs, then exhale and lower your arms.

Tips for Success

  • Start Small: Can't hold it for 30 seconds? No problem. Start with 15-second holds and build up gradually. Consistency trumps duration every time.
  • Use a Wall: For extra support, practice with your back against a wall, sliding down into the pose.
  • Mind Your Knees: Keep your knees tracking over your ankles, not jutting out past your toes. This protects the joint from unnecessary strain.
  • Get Tech-Savvy: Use a tool like Dalm to get real-time feedback on your alignment. Its AI can analyze your knee position and depth, ensuring you're building strength safely and effectively.

2. Warrior II (Virabhadrasana II)

Step onto your mat and channel your inner hero with Warrior II. This powerful standing pose is more than just an impressive-looking yoga staple; it’s a masterclass in building balanced strength and stability around your knees. Virabhadrasana II is the ultimate multi-tasker, strengthening the quadriceps and glutes of the front leg while simultaneously opening the hips and engaging the inner thighs. This combination of strength and mobility is exactly what knees need to feel secure and supported.

By holding this pose, you're not just striking a powerful stance; you're teaching your body about proper alignment and muscular engagement. It builds endurance in the key leg muscles that act as the knee's personal bodyguards. For anyone serious about finding effective yoga poses for knee strengthening, Warrior II provides the perfect blend of stability, strength, and spatial awareness that translates directly to safer movement in your daily life.

Why It's a Knee-Strengthening MVP

Warrior II is a champion of lateral stability. It trains the muscles on the sides of your hips (like the gluteus medius) to fire correctly, which prevents the knee from collapsing inward, a common cause of knee pain and injury. Runners and dancers use this pose to correct muscular imbalances and build the hip-knee coordination needed for dynamic, side-to-side movements.

How to Command Your Inner Warrior

  1. Set Your Stance: Start by standing with your feet wide apart, about 3 to 4 feet, parallel to the short edges of your mat.
  2. Align Your Feet: Turn your right foot out 90 degrees so your toes point to the front of the mat. Pivot your left foot slightly inward. Align your front heel with the arch of your back foot.
  3. Bend and Extend: Inhale and raise your arms parallel to the floor, extending them out from your sides. Exhale and bend your right knee over your right ankle, so your shin is perpendicular to the floor.
  4. Engage and Gaze: Press the outer edge of your back foot firmly into the mat. Keep your torso upright and your shoulders stacked over your hips. Turn your head to look out over your front fingertips.
  5. Hold with Power: Breathe deeply, holding the pose for 30-60 seconds. To release, inhale and straighten your front leg, then switch sides.

Tips for Success

  • Mind the Knee: Your front knee should point straight ahead, tracking directly over your ankle. Avoid letting it collapse inward or push out past your toes.
  • Stay Grounded: Actively press the outer edge of your back foot into the floor. This simple action engages the entire leg and stabilizes the pose.
  • Start Narrow: If a wide stance feels unstable, start with your feet closer together and gradually increase the distance as your strength and flexibility improve.
  • Get Real-Time Guidance: Use an AI tool like Dalm to analyze your knee tracking and weight distribution. It can provide instant feedback to ensure your knee is safely aligned over your ankle, maximizing strengthening benefits and minimizing risk.

3. Crescent Lunge (Anjaneyasana)

Enter the Crescent Lunge, a pose that looks like a graceful declaration of victory and feels like a focused boot camp for your legs. Anjaneyasana is a dynamic standing pose that masterfully strengthens the quadriceps and glutes of your front leg while delivering a deep, satisfying stretch to the hip flexors of your back leg. This dual-action approach is a game-changer for knee health, addressing common muscular imbalances that often lead to knee pain and instability.

This pose is a cornerstone among yoga poses for knee strengthening because it simultaneously builds power and enhances flexibility. By teaching your front leg to stabilize under load and your back leg to lengthen, you create a balanced, resilient lower body. It’s the kind of intelligent strength that marathon runners and CrossFit athletes rely on to power their movements and protect their joints from repetitive stress.

A man performs a high lunge yoga pose on a mat, arms reaching upwards for stability.

Why It's a Knee-Strengthening MVP

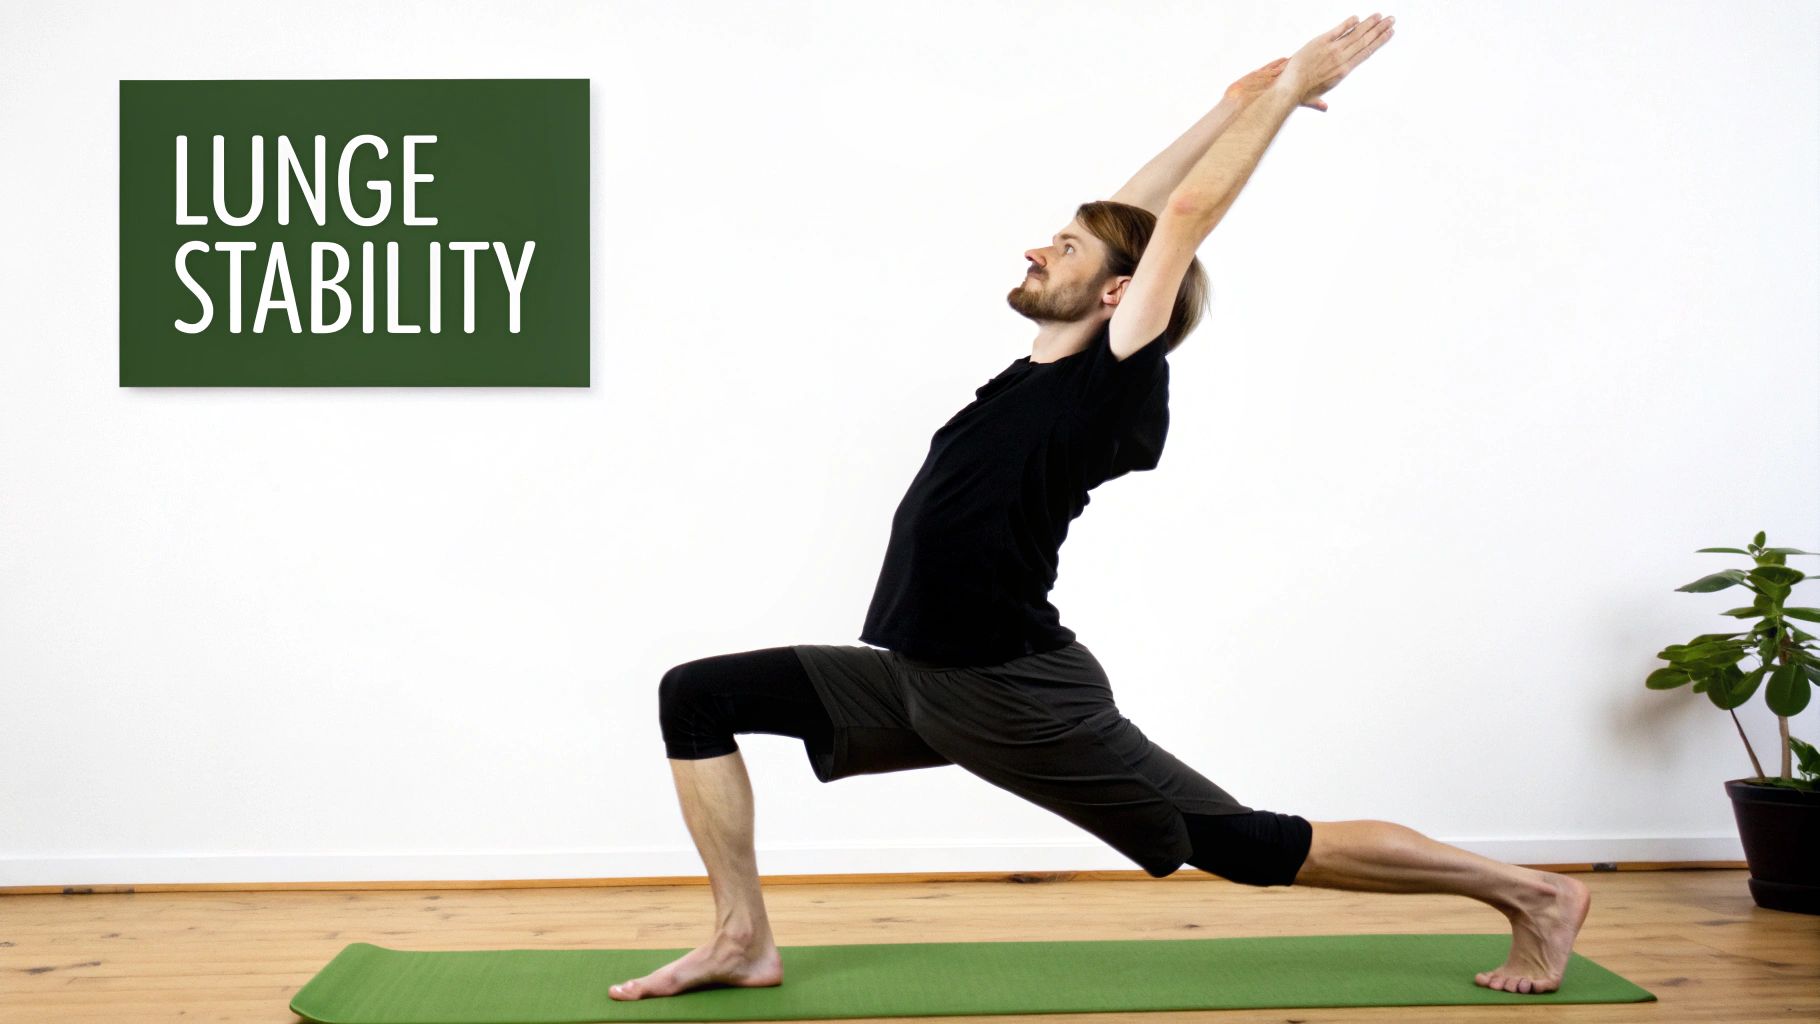
Crescent Lunge trains your body to handle asymmetrical loads, which is how we move through most of life (walking, running, climbing stairs). It builds robust strength in the vastus medialis obliquus (VMO), a key quad muscle that helps stabilize the kneecap. A strong VMO is your knee's best friend, ensuring proper tracking and reducing wear and tear on the joint. The pose also improves hip mobility, which takes undue pressure off the knees.

How to Find Your Victorious Lunge

  1. Step Forward: From Mountain Pose, step your left foot back about 3-4 feet, landing on the ball of the foot. Your front (right) foot should be flat on the mat.
  2. Bend and Align: Bend your right knee so it stacks directly over your right ankle, forming a 90-degree angle. Your shin should be perpendicular to the floor.
  3. Lift Up: Inhale and sweep your arms overhead, palms facing each other. Keep your hips squared and level with the front of your mat.
  4. Engage the Back Leg: Actively press your back heel away from you to keep the back leg straight and engaged. Feel the energy running from your heel all the way up your leg.
  5. Hold and Breathe: Settle into the pose, engage your core, and breathe steadily for 30-60 seconds. To release, exhale and lower your hands, stepping the back foot forward. Repeat on the other side.

Tips for Success

  • Mind the Knee: Your front knee should always point straight ahead, tracking in line with your second toe. Never let it collapse inward or drift past your ankle.
  • Level Your Hips: It's common for the back hip to hike up. Consciously draw the front hip back and the back hip forward to keep them squared.
  • Find Your Foundation: If you feel wobbly, widen your stance from left to right as if your feet are on separate train tracks, not a tightrope.
  • Use AI for Precision: Tracking your alignment is critical. A tool like Dalm can offer immediate feedback on your knee-over-ankle placement and hip levelness, helping you build strength symmetrically and safely.

4. Bridge Pose (Setu Bandhasana)

Don't let the relaxed, on-your-back starting position fool you; Bridge Pose is a stealthy and powerful knee-strengthening hero. Setu Bandhasana, or "Bridge Construction Pose," builds a literal bridge of strength across your posterior chain. This pose fires up your glutes and hamstrings, the unsung champions of knee health. When these muscles are strong, they take a significant amount of pressure and strain off the knee joint, acting as a natural, powerful support system.

It's a foundational pose in both yoga and physical therapy for a reason. By activating the muscles that stabilize the hips and pelvis, Bridge Pose ensures your knees track properly and don't have to overcompensate for weaknesses elsewhere. For anyone seeking effective yoga poses for knee strengthening, this posture proves you don't always have to be standing to build serious, functional lower-body power.

A woman in black activewear and a green resistance band performing a yoga bridge pose on a mat.

Why It's a Knee-Strengthening MVP

Bridge Pose is a masterclass in isolating and activating the gluteus maximus. Strong glutes are critical for knee stability, as they control the femur (thigh bone) and prevent it from rotating inward, a common cause of knee pain. Physical therapists frequently prescribe this exact movement in post-surgery knee rehabilitation programs because it strengthens key support muscles without placing direct weight-bearing stress on the joint itself.

How to Build Your Bridge

  1. Get Situated: Lie on your back with your knees bent and feet flat on the floor, hip-width apart. You should be able to just graze your heels with your fingertips.
  2. Prepare for Liftoff: Rest your arms alongside your body, palms down. Keep your gaze directed toward the ceiling to maintain a neutral neck.
  3. Engage and Lift: Exhale and press firmly through your heels and the palms of your hands to lift your hips off the floor. Squeeze your glutes and hamstrings as you rise.
  4. Find Your Form: Create a straight line from your shoulders to your knees. Keep your knees tracking directly over your ankles, preventing them from splaying out or collapsing inward.
  5. Hold the Pose: Breathe steadily and hold for 30-60 seconds. To release, exhale and slowly roll your spine back down to the mat, one vertebra at a time.

Tips for Success

  • Heel Power: Focus on pressing through your heels to maximize glute and hamstring engagement.
  • Knee Alignment is Key: Imagine you're holding a yoga block between your knees to keep them from drifting apart. This ensures the correct muscles are working to support your knees.
  • Avoid Over-Arching: Lift with your glutes, not by arching your lower back. Your core should be gently engaged.
  • Tech-Assisted Precision: For an extra challenge, try a single-leg variation. Use a tool like Dalm to monitor your hip alignment. Its AI can detect if one side is dropping, helping you identify and correct strength imbalances between your legs for balanced, resilient knees.

5. Warrior I (Virabhadrasana I)

Step onto your mat and channel your inner hero with Warrior I. Virabhadrasana I is more than just a powerful-looking lunge; it’s a masterclass in building integrated strength that supports your knees from every angle. This pose fires up your quadriceps and glutes in the front leg while stretching the hip flexors of the back leg, creating a dynamic balance of strength and flexibility that is crucial for knee health.

This isn't just a static hold; it's an active engagement. Warrior I teaches your body to stabilize the knee joint while under load, a skill that translates directly to walking, climbing stairs, and running. For anyone serious about using yoga poses for knee strengthening, this foundational pose builds the kind of resilient, functional power that protects your joints in motion. It's a true champion of knee stability.

Why It's a Knee-Strengthening MVP

Warrior I is a staple in everything from ballet conditioning to ACL rehabilitation programs for good reason. It trains the front leg to maintain perfect alignment under pressure, preventing the knee from collapsing inward (a common cause of injury). By demanding core engagement and hip stability, it reinforces the entire kinetic chain, ensuring your knees aren't taking on more work than they should.

How to Embody Your Inner Warrior

  1. Set Your Foundation: From Mountain Pose, step your left foot back about 3 to 4 feet. Angle your back foot to 45 degrees, with the heel grounded.
  2. Lunge with Purpose: Exhale and bend your right knee so it stacks directly over your right ankle. Your shin should be perpendicular to the floor.
  3. Square Up: Actively work to square your hips toward the front of the mat. This might mean you need to internally rotate your back thigh.
  4. Rise Up: Inhale and lift your arms overhead, either parallel with palms facing in or with palms touching. Keep your shoulders relaxed down your back.
  5. Hold Your Ground: Engage your core to support your lower back and maintain stability. Breathe deeply, holding for 30-60 seconds. To release, straighten your front leg and step your back foot forward, then repeat on the other side.

Tips for Success

  • Start with a Shorter Stance: If grounding your back heel is a challenge, shorten your stance. Widen it only as your strength and flexibility improve.
  • Mind the Front Knee: Your front knee must track over your ankle. Avoid letting it collapse inward or drift past your toes.
  • Use a Prop: If your back heel lifts, you can place a folded blanket under it for support as you build calf flexibility.
  • Check Your Hips: The goal is to square your hips forward. This engages the muscles around the knee and hip more effectively.
  • Get AI Feedback: Ensure perfect alignment with a tool like Dalm. Its AI can analyze your front knee's position, preventing inward collapse and ensuring you’re safely maximizing the strengthening benefits of the pose.

6. Standing Straight Leg Raise (Utthita Hasta Padangusthasana variation)

Get ready to channel your inner martial artist. The Standing Straight Leg Raise isn't just a cool-looking balance pose; it's a secret weapon for forging unshakeable knee stability. This variation of Utthita Hasta Padangusthasana forces your standing leg to become a pillar of strength, firing up the quadriceps and glutes to keep you upright and steady. It’s a masterclass in single-leg stability and control.

While one leg gets a nice stretch, the real magic is happening in the leg planted on the ground. It’s undergoing an intense isometric workout, where the muscles contract without changing length. This builds incredible endurance and proprioceptive awareness, teaching your knee how to stay stable under pressure. This is precisely why it's a go-to move for anyone looking for dynamic yoga poses for knee strengthening that translate directly to real-world activities like walking, running, and climbing stairs.

Why It's a Knee-Strengthening MVP

This pose is a favorite in physical therapy clinics for a reason. It isolates and strengthens the muscles of the standing leg, particularly the vastus medialis (the teardrop-shaped quad muscle) which is a key stabilizer of the kneecap. By forcing your body to balance on one foot, you're training the intricate network of muscles, ligaments, and nerves around the knee to work together in perfect harmony, which is critical for ACL injury rehabilitation and prevention.

How to Achieve Liftoff

  1. Find Your Foundation: Start in Mountain Pose (Tadasana), rooting down firmly through your left foot.
  2. Engage and Lift: Place your hands on your hips. Engage your core and transfer your weight onto your left leg. On an exhale, slowly lift your right leg straight out in front of you.
  3. Find Your Height: Raise your leg only as high as you can while keeping your back straight and your standing leg strong. Don't worry about getting it parallel to the floor initially.
  4. Stay Strong: Keep a micro-bend in your standing knee to avoid locking the joint. Flex your raised foot and engage your quadriceps.
  5. Hold and Release: Hold the pose for 15-30 seconds, breathing steadily. To release, slowly lower your right leg back to the floor. Repeat on the other side.

Tips for Success

  • Lean on Me: Don't be a hero. Start by holding onto a wall or a sturdy chair for balance. The goal is stability, not a wobbly performance.
  • Don't Lock Up: Locking your standing knee is a common mistake that puts stress on the joint. Always maintain a slight, soft bend.
  • Stay Upright: Avoid the temptation to lean back or to the side. Keep your torso tall and your core engaged to maintain a neutral spine.
  • Use Your Support System: For precision alignment, an AI tool like Dalm can be invaluable. It can monitor the alignment of your standing knee and ensure you aren't hyperextending or letting it collapse inward, maximizing safety and benefit.

7. Half Moon Pose (Ardha Chandrasana)

Prepare to defy gravity! Half Moon Pose is where balance, strength, and grace have a party, and your knee is the guest of honor. Ardha Chandrasana challenges the standing leg to become a stable pillar of support, firing up the quadriceps, glutes, and the tiny stabilizer muscles around the ankle and knee. This isn't just about holding still; it's about actively engaging every muscle fiber to create unwavering stability.

This pose is a masterclass in proprioception. By balancing on one leg while extending in multiple directions, you are teaching your body to understand its position in space with incredible precision. This heightened awareness is a crucial defense against unexpected twists and stumbles that can lead to knee injuries. For anyone serious about finding dynamic yoga poses for knee strengthening, Half Moon Pose is a non-negotiable challenge that builds both power and intelligence in your joints.

Why It's a Knee-Strengthening MVP

Half Moon Pose is a triple threat. It strengthens the standing leg's quadriceps and glutes, enhances ankle stability (a key ally for the knee), and improves hip mobility. When your hips and ankles are stable and mobile, your knee doesn't have to overcompensate and take on extra strain. Athletes and physical therapists use it in advanced rehabilitation to rebuild the intricate neuromuscular connections that protect the knee during complex movements.

How to Shine Like the Moon

  1. Start from Triangle: Begin in Triangle Pose (Trikonasana) with your right foot forward.
  2. Prepare for Liftoff: Bend your right knee and bring your left hand to your hip. Place your right fingertips on the floor or a block about a foot in front of your right foot.
  3. Launch Your Moon: Shift your weight into your right foot. Inhale and straighten your right leg as you lift your left leg parallel to the floor. Your standing leg is now doing the heavy lifting.
  4. Open and Extend: Stack your left hip over your right hip, opening your torso to the side. Extend your left arm toward the ceiling, creating a straight line from hand to hand. Keep your gaze neutral or turn it up toward your top hand.
  5. Hold and Breathe: Press firmly through your standing foot, keeping a micro-bend in the knee. Hold for 15-30 seconds. To exit, exhale and slowly lower your back leg, returning to your starting position. Repeat on the other side.

Tips for Success

  • Bring the Floor Closer: Don't hesitate to use a block under your bottom hand. It provides support and helps you find your alignment without straining.
  • Avoid Locked Knees: Keep a slight, almost imperceptible bend in your standing knee. This engages the muscles rather than dumping weight into the joint.
  • Root to Rise: Actively press your standing foot into the mat, engaging all four corners. This creates a stable foundation for the entire pose.
  • Check Your Alignment: Your standing knee should point straight forward, aligned with your middle toes. Use an AI tool like Dalm to get real-time feedback on this crucial alignment point, ensuring you're building strength, not strain.
  • Engage Your Core: A strong core is the secret to balance. Pull your navel toward your spine to stabilize your entire torso.

8. Locust Pose (Salabhasana)

At first glance, Locust Pose might seem like an odd choice for this list. You're lying on your stomach, so what could it possibly do for your knees? The answer: everything that happens on the other side of your legs. Salabhasana is the unsung hero for knee health, targeting the entire posterior chain: your glutes, hamstrings, and lower back muscles. This creates a powerful support system that counteracts the quad-dominant movements of daily life.

Strengthening these "pulling" muscles is a game-changer. Strong glutes and hamstrings provide crucial stability, ensuring your kneecap tracks correctly and reducing strain on the joint's ligaments. For anyone seeking comprehensive yoga poses for knee strengthening, Locust Pose is essential for building a balanced, resilient lower body that protects the knees from the back, not just the front.

Why It's a Knee-Strengthening MVP

Locust Pose is the ultimate antidote to "sitting disease." By activating the glutes and hamstrings, it directly counteracts the tight hip flexors and sleepy glutes that can pull the pelvis out of alignment and create knee dysfunction. Physical therapists often prescribe this move in knee pain management programs because it builds foundational strength without putting any direct weight or flexion on the knee joint itself, making it incredibly safe and effective.

How to Take Flight

  1. Prepare for Liftoff: Lie on your belly with your legs hip-width apart and your arms alongside your body, palms facing up. Rest your forehead on the mat.
  2. Ground Down: Press your pelvis and the tops of your thighs firmly into the floor. This is key to activating your glutes.
  3. Lift Everything: Inhale and lift your head, chest, arms, and legs off the floor. Keep your legs straight and engage your glutes to lift from the hips, not by bending your knees.
  4. Find Your Form: Reach back through your fingertips and toes. Keep your neck as a neutral extension of your spine, looking slightly forward and down.
  5. Hold and Breathe: Stay lifted for 20-30 seconds, breathing steadily. To release, exhale and gently lower everything back to the mat.

Tips for Success

  • Focus on the Glutes: The lift should originate from a powerful glute squeeze. If you don't feel it, you're likely using your lower back too much.
  • Keep Legs Straight: Avoid the temptation to bend your knees to get more height. The goal is to strengthen the hamstrings and glutes in their extended position.
  • Protect Your Back: Engage your core by drawing your navel toward your spine to prevent lower back compression. The lift should feel expansive, not pinchy.
  • Start Small: Begin by lifting just your legs, or just your upper body. You can also practice lifting one leg at a time to build strength incrementally.
  • Check Your Alignment: Use a tool like Dalm to get real-time feedback. Its AI can help verify you are achieving proper glute activation and maintaining a neutral spine, ensuring you're strengthening the right muscles safely.

8-Pose Knee Strengthening Comparison

Pose🔄 Complexity⚡ Resource requirements📊 Expected outcomesIdeal use cases⭐ Key advantages / 💡 Quick tip
Chair Pose (Utkatasana)Low–Moderate — simple alignment, holds challengeMinimal — mat; optional wall/supportBuilds quadriceps strength and endurance; improves balance 📊Knee-stability training, general strength, measurable progress tracking⭐ Multimuscle activation; modifiable. 💡 Keep knees over ankles; start with 15–20s holds.
Warrior II (Virabhadrasana II)Moderate — alignment-focused (hip/knee tracking)Minimal — mat; mirror or Dalm feedback helpfulUnilateral leg strength, hip opening, improved knee tracking 📊Runners, dancers, rehab for lateral stability⭐ Identifies imbalances; accessible with mods. 💡 Ensure front knee tracks over ankle.
Crescent Lunge (Anjaneyasana)Moderate–High — depth and balance requiredMinimal — mat; blocks optionalStrong unilateral quads/glutes + hip flexor stretch; dynamic stability 📊Runners, CrossFit, dynamic knee rehab⭐ Combines strength + mobility. 💡 Stack front knee over ankle; press back heel away.
Bridge Pose (Setu Bandhasana)Low — supine entry, low joint stressMinimal — mat; optional block/strapPosterior chain strengthening (glutes/hamstrings); reduces knee load 📊Rehab, beginners, seniors, low-impact strengthening⭐ Low impact; isolates glutes. 💡 Press through heels; keep neck neutral.
Warrior I (Virabhadrasana I)High — requires strength + hip flexibilityMinimal — mat; possible props for balanceDeep quad/glute strengthening and hip mobility; improved proprioception 📊Advanced rehab phases, ballet/dance strength work⭐ Comprehensive knee support when aligned. 💡 Square hips forward; engage core.
Standing Straight Leg Raise (balance variation)High — significant single-leg balance challengeMinimal — mat; wall/chair or Dalm support recommendedIsolated quadriceps isometric strength; proprioception and ankle stability 📊Athletes, dancers, physiotherapy for single-leg control⭐ Rapid balance gains; small equipment. 💡 Keep standing knee slightly bent; use support initially.
Half Moon Pose (Ardha Chandrasana)High — balance + flexibility demandingMinimal — mat; block or wall for regressionsDeep single-leg quad strength, hip mobility, ankle stabilizers 📊Advanced yoga, athletes, late-phase rehab⭐ Excellent for proprioception & ankle strength. 💡 Start with hand on block; avoid locking knee.
Locust Pose (Salabhasana)Low–Moderate — prone activation focusMinimal — mat; optional cushionPosterior chain strengthening (glutes/hamstrings) that supports knee mechanics 📊Sedentary individuals, runners, knee-pain programs⭐ Safe for sensitive knees; counters hip-flexor tightness. 💡 Lift from hips; engage core to protect back.

From Mat to Movement: Making Knee Strength a Daily Reality

You've officially graduated from knee-strengthening boot camp! You’ve journeyed through the fiery thighs of Chair Pose, balanced with the grace of Half Moon, and powered up your posterior chain with Bridge Pose. But let's be real: knowing these poses is like having a map. The real adventure begins when you start exploring the territory. The goal isn't just to know the best yoga poses for knee strengthening; it's to weave them into the fabric of your daily life, transforming them from a checklist into a powerful, knee-stabilizing habit.

The secret isn't a single, grueling, two-hour yoga session that leaves you sore for a week. It's about consistency. It's about showing up on your mat, even for just ten minutes, and whispering to your knees, "I've got your back." Or, more accurately, "I've got your quads, hamstrings, and glutes."

Your Action Plan for Bulletproof Knees

So, where do you go from here? The path from knowledge to real-world strength is paved with small, deliberate steps. Forget trying to master all eight poses by Friday. Instead, let's create a sustainable plan that actually works for your life.

Here’s your three-step launch sequence:

  1. Pick Your "Fab Three": Scroll back through the list and choose just three poses that felt the most accessible or interesting to you. Maybe it's the foundational power of Warrior II, the glute-firing magic of Bridge Pose, and the surprising challenge of the Standing Straight Leg Raise. These three are your new best friends.
  2. Commit to 10-a-Day: Find 10 minutes in your day. That's it. Maybe it's while your coffee brews, during a commercial break, or as a way to decompress after work. Practice your "Fab Three" poses in that window. Focus on quality over quantity, really tuning into the sensations of engagement around your knees.
  3. Listen and Log: Your body is constantly giving you feedback. After each mini-session, take 30 seconds to notice how you feel. Are your legs a little shaky? Do you feel more stable? Jot down a quick note in a journal or your phone. This simple act of tracking builds momentum and helps you recognize your progress.

Key Takeaway: Consistency will always beat intensity when it comes to building resilient joints. A short, focused daily practice is far more effective for long-term knee health than sporadic, intense workouts.

Sequencing, Smarter Practice, and Celebrating Wins

Once you feel confident with your initial poses, you can start to play. Think of yourself as a DJ, mixing and matching poses to create a flow. A beautiful, simple sequence could be moving from Warrior I directly into Warrior II, and then challenging your balance with Half Moon Pose. This not only builds strength but also improves your proprioception, your body’s awareness of its position in space, which is critical for preventing knee injuries.

This is also where technology can become your most valuable training partner. It’s one thing to think your alignment is correct in Crescent Lunge, but it's another to know it. Without an expert eye, it's easy to let the front knee drift past the ankle or allow the hips to misalign, inadvertently putting pressure on the very joint you're trying to protect.

This is where AI-powered tools provide a massive advantage. Imagine having a digital physical therapist in your living room, giving you real-time, medical-grade feedback. That's the power you can tap into to ensure your practice is not just effective but, most importantly, safe. Celebrating your progress, whether it's holding Chair Pose for five more seconds or finally feeling stable in Half Moon without wobbling, is the fuel that will keep your motivation engine running. Your journey to mastering yoga poses for knee strengthening is a marathon, not a sprint. Each small victory is a step toward a more active, confident, and pain-free life, where your knees support your adventures instead of holding you back.


Ready to take the guesswork out of your alignment and accelerate your knee-strengthening journey? With its medical-grade AI motion analysis, Dalm provides real-time feedback to ensure you perform every pose safely and effectively, just like a physical therapist would. Start your smarter, safer practice today by visiting Dalm.

... more insights